
|
受注:045-509-1970 |
技術サポート:tech@selleck.co.jp 平日9:00〜18:00 1営業日以内にご連絡を差し上げます |
生物学的記述
| Specificity | FYCO1 Antibody (Rabbit mAb) [G4K12] detects endogenous levels of total FYCO1 protein. |
|---|---|
| Background | FYCO1, or FYVE and coiled‑coil domain–containing 1, is an autophagy adaptor protein that links macroautophagic vesicles to the microtubule transport machinery and situates them within the broader endolysosomal trafficking network, functioning in the autophagy pathway rather than in classical transcription factor or signaling receptor families. The protein carries a coiled‑coil region, a C‑terminal LC3‑interacting region, and a FYVE domain that binds phosphatidylinositol 3‑phosphate, creating a multivalent interface for simultaneous engagement of LC3‑decorated autophagosomal membranes, PI3P lipids, and small GTPases. Through its LC3‑binding motif, FYCO1 recognizes ATG8/LC3‑family proteins on autophagosome membranes and couples these vesicles to plus‑end–directed microtubule motors, establishing directional transport toward the cell periphery and coordinating positioning of autophagic compartments with the distribution of late endosomes and lysosomes. Interaction with Rab7 identifies FYCO1 as a Rab7 effector, supporting the maturation and trafficking of Rab7‑positive autophagosomes and endosomes, and aligning vesicle motility with Rab7‑dependent steps in late endocytic and autophagic processing. FYCO1 recruitment to autophagosomal membranes involves recognition of LC3 via its extended LIR motif, followed by conformational exposure of the FYVE domain for PI3P binding, a sequence that creates a spatially restricted tether integrating LC3, PI3P, and Rab7, which collectively stabilize transport complexes along microtubules. Depletion of FYCO1 causes autophagosomes to accumulate in perinuclear clusters rather than move outward, indicating that FYCO1 activity is required for efficient redistribution of autophagic vesicles and for maintaining the dynamic balance between perinuclear and peripheral autophagic compartments. Overexpression of FYCO1 drives Rab7‑positive vesicles and LC3‑decorated autophagosomes toward microtubule plus ends, increasing their presence at the cell periphery and demonstrating that FYCO1 dosage can modulate autophagic vesicle routing and the spatial organization of degradative organelles. The capacity of FYCO1 to bind LC3, PI3P, and Rab7 in parallel defines it as a central organizing node for autophagosome transport and a key adaptor for microtubule-dependent vesicle motility and maturation. Dysregulation of FYCO1, particularly loss‑of‑function, alters autophagosome positioning and Rab7‑positive vesicle dynamics, and these changes have been implicated in tissue contexts such as the crystalline lens and other specialized cells where precise autophagic clearance is important for maintaining transparency or structural integrity. Loss or misregulation of FYCO1 disrupts microtubule‑dependent autophagic transport, contributing to autophagy-related pathologies. |
使用情報
| Application | WB, IP, IHC | Dilution |
|
||||||
|---|---|---|---|---|---|---|---|---|---|
| Reactivity | Mouse, Rat | ||||||||
| Source | Rabbit Monoclonal Antibody | MW | 167 kDa | ||||||
| Storage Buffer | PBS, pH 7.2+50% Glycerol+0.05% BSA+0.01% NaN3 | Storage (from the date of receipt) |
-20°C (avoid freeze-thaw cycles), 2 years | ||||||
| WB |
Experimental Protocol:
Sample preparation
1. Tissue: Lyse the tissue sample by adding an appropriate volume of ice-cold RIPA/NP-40 Lysis Buffer (containing Protease Inhibitor Cocktail),and homogenize the tissue at a low temperature or lyse it by sonication on ice, then incubate on ice for 30 minutes. 2. Adherent cell: Aspirate the culture medium and wash the cells with ice-cold PBS twice. Lyse the cells by adding an appropriate volume of RIPA/NP-40 Lysis Buffer (containing Protease Inhibitor Cocktail) , sonicate to lyse the cells, and incubate on ice for 30 minutes. 3. Suspension cell: Transfer the culture medium to a pre-cooled centrifuge tube. Centrifuge and aspirate the supernatant. Wash the cells with ice-cold PBS twice. Lyse the cells by adding an appropriate volume of RIPA/NP-40 Lysis Buffer (containing Protease Inhibitor Cocktail) , sonicate to lyse the cells, and incubate on ice for 30 minutes. 4. Place the lysate into a pre-cooled microcentrifuge tube. Centrifuge at 4°C for 15 min. Collect the supernatant;
5. Remove a small volume of lysate to determine the protein concentration;
6. Combine the lysate with protein loading buffer. Boil 20 µL sample under 95-100°C for 5 min. Centrifuge for 5 min after cool down on ice.
Electrophoretic separation
1. According to the concentration of extracted protein, load appropriate amount of protein sample and marker onto SDS-PAGE gels for electrophoresis. Recommended separating gel (lower gel) concentration: 5%. Reference Table for Selecting SDS-PAGE Separation Gel Concentrations 2. Power up 80V for 30 minutes. Then the power supply is adjusted (110 V~150 V), the Marker is observed, and the electrophoresis can be stopped when the indicator band of the predyed protein Marker where the protein is located is properly separated. (Note that the current should not be too large when electrophoresis, too large current (more than 150 mA) will cause the temperature to rise, affecting the result of running glue. If high currents cannot be avoided, an ice bath can be used to cool the bath.)
Transfer membrane
1. Take out the converter, soak the clip and consumables in the pre-cooled converter;
2. Activate PVDF membrane with methanol for 1 min and rinse with transfer buffer;
3. Install it in the order of "black edge of clip - sponge - filter paper - filter paper - glue -PVDF membrane - filter paper - filter paper - sponge - white edge of clip"; 4. The protein was electrotransferred to PVDF membrane. ( 0.45 µm PVDF membrane is recommended ) Reference Table for Selecting PVDF Membrane Pore Size Specifications Recommended conditions for wet transfer: 200 mA, 120 min. ( Note that the transfer conditions can be adjusted according to the protein size. For high-molecular-weight proteins, a higher current and longer transfer time are recommended. However, ensure that the transfer tank remains at a low temperature to prevent gel melting.)
Block
1. After electrotransfer, wash the film with TBST at room temperature for 5 minutes;
2. Incubate the film in the blocking solution for 1 hour at room temperature;
3. Wash the film with TBST for 3 times, 5 minutes each time.
Antibody incubation
1. Use primary antibody dilution buffer to prepare the primary antibody working liquid (recommended dilution ratio for primary antibody 1:1000), gently shake and incubate with the film at 4°C overnight; 2. Wash the film with TBST 3 times, 5 minutes each time;
3. Add the secondary antibody to the blocking solution and incubate with the film gently at room temperature for 1 hour;
4. After incubation, wash the film with TBST 3 times for 5 minutes each time.
Antibody staining
1. Add the prepared ECL luminescent substrate (or select other color developing substrate according to the second antibody) and mix evenly;
2. Incubate with the film for 1 minute, remove excess substrate (keep the film moist), wrap with plastic film, and expose in the imaging system. (Exposure time of at least 150s is recommended)
|
| IHC |
Experimental Protocol:
Deparaffinization/Rehydration
1. Deparaffinize/hydrate sections:
2. Incubate sections in three washes of xylene for 5 min each.
3. Incubate sections in two washes of 100% ethanol for 10 min each.
4. Incubate sections in two washes of 95% ethanol for 10 min each.
5. Wash sections two times in dH2O for 5 min each.
6.Antigen retrieval: For Citrate: Heat slides in a microwave submersed in 1X citrate unmasking solution until boiling is initiated; continue with 10 min at a sub-boiling temperature (95°-98°C). Cool slides on bench top for 30 min.
Staining
1. Wash sections in dH2O three times for 5 min each.
2. Incubate sections in 3% hydrogen peroxide for 10 min.
3. Wash sections in dH2O two times for 5 min each.
4. Wash sections in wash buffer for 5 min.
5. Block each section with 100–400 µl of blocking solution for 1 hr at room temperature.
6. Remove blocking solution and add 100–400 µl primary antibody diluent in to each section. Incubate overnight at 4°C.
7. Remove antibody solution and wash sections with wash buffer three times for 5 min each.
8. Cover section with 1–3 drops HRPas needed. Incubate in a humidified chamber for 30 min at room temperature.
9. Wash sections three times with wash buffer for 5 min each.
10. Add DAB Chromogen Concentrate to DAB Diluent and mix well before use.
11. Apply 100–400 µl DAB to each section and monitor closely. 1–10 min generally provides an acceptable staining intensity.
12. Immerse slides in dH2O.
13. If desired, counterstain sections with hematoxylin.
14. Wash sections in dH2O two times for 5 min each.
15. Dehydrate sections: Incubate sections in 95% ethanol two times for 10 sec each; Repeat in 100% ethanol, incubating sections two times for 10 sec each; Repeat in xylene, incubating sections two times for 10 sec each.
16. Mount sections with coverslips and mounting medium.
|
References
|
Application Data
WB
Validated by Selleck
-
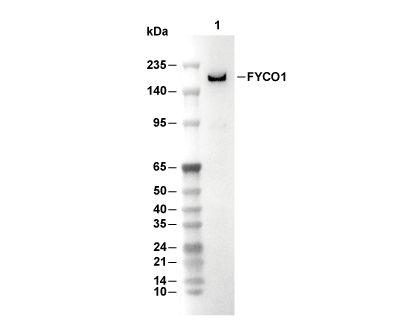 Lane 1: Neuro-2a