
|
受注:045-509-1970 |
技術サポート:tech@selleck.co.jp 平日9:00〜18:00 1営業日以内にご連絡を差し上げます |
生物学的記述
| Specificity | Glu-Glu Epitope Tag Antibody (Mouse mAb) [N24M2] detects artificially engineered Glu-Glu epitope tag. |
|---|---|
| Background | The Glu‑Glu epitope tag is a short peptide tag derived from the middle T antigen of mouse polyomavirus, most commonly used in the form of the hexapeptide EYMPME (H‑Glu‑Tyr‑Met‑Pro‑Met‑Glu‑OH), and is incorporated into recombinant proteins to enable highly specific detection and isolation without substantially perturbing their native structure or functions. The tag consists of two glutamic acid residues flanking a core tyrosine–methionine–proline–methionine sequence, sometimes presented with an N‑terminal cysteine (CEEEEYMPME) for conjugation purposes, and this unique amino acid arrangement forms a compact, solvent‑exposed epitope that is recognized with high affinity by dedicated Glu‑Glu monoclonal and polyclonal antibodies in western blotting, immunofluorescence, immunocytochemistry, ELISA and immunoprecipitation. The tag is usually engineered at the N‑ or C‑terminus of a protein via subcloning into expression vectors (for example, baculovirus pFASTBAC systems) and functions as an inert reporter sequence: its short length and lack of strong secondary structure reduce interference with protein folding or activity, while its defined chemical composition supports robust antibody binding and, when required, chemical coupling through added cysteine or pyroglutamyl modifications. Because the EYMPME sequence is not present in most mammalian proteins and is derived from viral medium T antigen, background reactivity in typical cell or tissue lysates is low, giving Glu‑Glu‑tagged constructs clear immunoblot bands and specific immunostaining signals that are easily distinguished from endogenous proteins. Commercial Glu‑Glu tag antibodies are raised against EYMPME conjugated to carrier proteins (often KLH), affinity‑purified on immobilized peptide and validated for multiple applications, with some clones recognizing both EYMPME and closely related EFMPME variants, providing flexibility in tag design while maintaining specificity. As with other epitope tags, placement relative to signal peptides, transmembrane segments or targeting sequences needs consideration to avoid masking the tag or misdirecting the fusion protein, but in general the Glu‑Glu tag offers a compact, chemically simple and immunologically distinct handle for tracking expression, verifying protein size, performing immunoprecipitation for complex analysis and quantifying recombinant proteins in diverse systems including insect and mammalian cells. |
使用情報
| Application | WB, IP, IF | Dilution |
|
||||||
|---|---|---|---|---|---|---|---|---|---|
| Reactivity | Epitope tag | ||||||||
| Source | Mouse Monoclonal Antibody | MW | |||||||
| Storage Buffer | PBS, pH 7.2+50% Glycerol+0.05% BSA+0.01% NaN3 | Storage (from the date of receipt) |
-20°C (avoid freeze-thaw cycles), 2 years | ||||||
| WB |
Experimental Protocol:
Sample preparation
1. Tissue: Lyse the tissue sample by adding an appropriate volume of ice-cold Lysis Buffer (containing Protease Inhibitor Cocktail),and homogenize the tissue at a low temperature. 2. Adherent cell: Aspirate the culture medium and wash the cells with ice-cold PBS twice. Lyse the cells by adding an appropriate volume of Lysis Buffer (containing Protease Inhibitor Cocktail) and put the sample on ice for 5 min. 3. Suspension cell: Transfer the culture medium to a pre-cooled centrifuge tube. Centrifuge and aspirate the supernatant. Wash the cells with ice-cold PBS twice. Lyse the cells by adding an appropriate volume of Lysis Buffer (containing Protease Inhibitor Cocktail) and put the sample on ice for 5 min. 4. Place the lysate into a pre-cooled microcentrifuge tube. Centrifuge at 4°C for 15 min. Collect the supernatant;
5. Remove a small volume of lysate to determine the protein concentration;
6. Combine the lysate with protein loading buffer. Boil 20 µL sample under 95-100°C for 5 min. Centrifuge for 5 min after cool down on ice.
Electrophoretic separation
1. According to the concentration of extracted protein, load appropriate amount of protein sample and marker onto SDS-PAGE gels for electrophoresis. Reference Table for Selecting SDS-PAGE Separation Gel Concentrations 2. Power up 80V for 30 minutes. Then the power supply is adjusted (110 V~150 V), the Marker is observed, and the electrophoresis can be stopped when the indicator band of the predyed protein Marker where the protein is located is properly separated. (Note that the current should not be too large when electrophoresis, too large current (more than 150 mA) will cause the temperature to rise, affecting the result of running glue. If high currents cannot be avoided, an ice bath can be used to cool the bath.)
Transfer membrane
1. Take out the converter, soak the clip and consumables in the pre-cooled converter;
2. Activate PVDF membrane with methanol for 1 min and rinse with transfer buffer;
3. Install it in the order of "black edge of clip - sponge - filter paper - filter paper - glue -PVDF membrane - filter paper - filter paper - sponge - white edge of clip"; 4. The protein was electrotransferred to PVDF membrane. Reference Table for Selecting PVDF Membrane Pore Size Specifications ( Note that the transfer conditions can be adjusted according to the protein size. For high-molecular-weight proteins, a higher current and longer transfer time are recommended. However, ensure that the transfer tank remains at a low temperature to prevent gel melting.)
Block
1. After electrotransfer, wash the film with TBST at room temperature for 5 minutes;
2. Incubate the film in the blocking solution for 1 hour at room temperature;
3. Wash the film with TBST for 3 times, 5 minutes each time.
Antibody incubation
1. Use primary antibody dilution buffer to prepare the primary antibody working liquid (recommended dilution ratio for primary antibody 1:1000), gently shake and incubate with the film at 4°C overnight; 2. Wash the film with TBST 3 times, 5 minutes each time;
3. Add the secondary antibody to the blocking solution and incubate with the film gently at room temperature for 1 hour;
4. After incubation, wash the film with TBST 3 times for 5 minutes each time.
Antibody staining
1. Add the prepared ECL luminescent substrate (or select other color developing substrate according to the second antibody) and mix evenly;
2. Incubate with the film for 1 minute, remove excess substrate (keep the film moist), wrap with plastic film, and expose in the imaging system.
|
| IF |
Experimental Protocol:
Sample Preparation
1. Adherent Cells: Place a clean, sterile coverslip in a culture dish. Once the cells grow to near confluence as a monolayer, remove the coverslip for further use.
2. Suspension Cells: Seed the cells onto a clean, sterile slide coated with poly-L-lysine.
3. Frozen Sections: Allow the slide to thaw at room temperature. Wash it with pure water or PBS for 2 times, 3 minutes each time.
4. Paraffin Sections: Deparaffinization and rehydration. Wash the slide with pure water or PBS for 3 times, 3 minutes each time. Then perform antigen retrieval.
Fixation
1. Fix the cell coverslips/spots or tissue sections at room temperature using a fixative such as 4% paraformaldehyde (4% PFA) for 10-15 minutes.
2. Wash the sample with PBS for 3 times, 3 minutes each time.
Permeabilization
1.Add a detergent such as 0.1–0.3% Triton X-100 to the sample and incubate at room temperature for 10–20 minutes.
(Note: This step is only required for intracellular antigens. For antigens expressed on the cell membrane, this step is unnecessary.)
Wash the sample with PBS for 3 times, 3 minutes each time.
Blocking
Add blocking solution and incubate at room temperature for at least 1 hour. (Common blocking solutions include: serum from the same source as the secondary antibody, BSA, or goat serum.)
Note: Ensure the sample remains moist during and after the blocking step to prevent drying, which can lead to high background.
Immunofluorescence Staining (Day 1)
1. Remove the blocking solution and add the diluted primary antibody.
2. Incubate the sample in a humidified chamber at 4°C overnight.
Immunofluorescence Staining (Day 2)
1. Remove the primary antibody and wash with PBST for 3 times, 5 minutes each time.
2. Add the diluted fluorescent secondary antibody and incubate in the dark at 4°C for 1–2 hours.
3. Remove the secondary antibody and wash with PBST for 3 times, 5 minutes each time.
4. Add diluted DAPI and incubate at room temperature in the dark for 5–10 minutes.
5. Wash with PBST for 3 times, 5 minutes each time.
Mounting
1. Mount the sample with an anti-fade mounting medium.
2. Allow the slide to dry at room temperature overnight in the dark.
3. Store the slide in a slide storage box at 4°C, protected from light.
|
References
|
Application Data
WB
Validated by Selleck
-
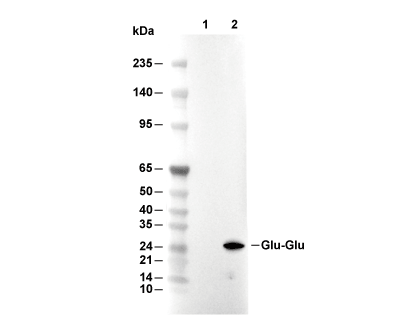 Lane 1: 293T, Lane 2: 293T (Glu-Glu tag-EGFP transfected)