
|
受注:045-509-1970 |
技術サポート:tech@selleck.co.jp 平日9:00〜18:00 1営業日以内にご連絡を差し上げます |
生物学的記述
| Specificity | IL-1α Antibody (Rabbit mAb) [A23L5] detects endogenous levels of total IL-1α protein. |
|---|---|
| Background | IL‑1α is a proinflammatory cytokine of the IL‑1 family that functions both as a classical secreted ligand and as a dual‑function alarmin constitutively present in many non‑hematopoietic cells, where it connects tissue damage and genotoxic stress to innate and adaptive immune activation. The protein is synthesized as a precursor that can signal in its full‑length form and contains a nuclear localization sequence that enables association with chromatin and nuclear factors, giving it access to DNA damage sites and regulatory complexes in addition to its membrane‑receptor interactions. At the plasma membrane level, IL‑1α binds IL1R1 together with the accessory protein IL1RAP to form a high‑affinity receptor complex, which recruits the adaptor MYD88 and downstream kinases IRAK1 and IRAK4, initiating a canonical signaling cascade that activates NF‑κB and the major MAPK pathways p38, ERK1/2 and JNK. This signaling architecture drives transcription of a broad inflammatory program that includes cytokines, chemokines and adhesion molecules, and thereby orchestrates leukocyte recruitment, stromal activation and the bridging of innate responses to adaptive immunity in inflamed or damaged tissues. Within resting parenchymal cells, IL‑1α is stored intracellularly and acts as an alarmin: necrotic cell death and membrane disruption release this preformed cytokine into the extracellular space, where it rapidly engages IL1R1 on neighboring cells and triggers local sterile inflammation without requiring new gene expression in the dying cells. Beyond passive release, IL‑1α directly senses DNA damage and transcription stress; it localizes to DNA damage sites, undergoes nucleo‑cytosolic shuttling regulated by histone deacetylases and IL‑1α acetylation, and is subsequently secreted to signal genotoxic stress to surrounding tissue, linking chromatin injury to NF‑κB activation and sterile inflammatory cascades. In UV‑irradiated skin, IL‑1α signaling is required for efficient sterile inflammation that supports tissue repair and wound healing, highlighting its role as an upstream danger signal in barrier organs subjected to environmental insult. After spinal cord injury, IL‑1α released from damaged microglia engages IL1R1 on astrocytes and endothelium, driving neutrophil infiltration, loss of mature oligodendrocytes and secondary degeneration, which illustrates how IL‑1α–dependent neuroimmune interactions influence progression of central nervous system damage. In the tumor microenvironment, IL‑1α participates in inflammatory loops that sustain myeloid cell recruitment, angiogenesis and cytokine cascades, and its context‑dependent roles can either support antitumor immunity or foster chronic inflammation that promotes cancer progression. |
使用情報
| Application | WB, IHC, IF | Dilution |
|
||||||
|---|---|---|---|---|---|---|---|---|---|
| Reactivity | Mouse, Human | ||||||||
| Source | Rabbit Monoclonal Antibody | MW | 31 kDa | ||||||
| Storage Buffer | PBS, pH 7.2+50% Glycerol+0.05% BSA+0.01% NaN3 | Storage (from the date of receipt) |
-20°C (avoid freeze-thaw cycles), 2 years | ||||||
| WB |
Experimental Protocol:
Sample preparation
1. Tissue: Lyse the tissue sample by adding an appropriate volume of ice-cold RIPA/NP-40 Lysis Buffer (containing Protease Inhibitor Cocktail),and homogenize the tissue at a low temperature or lyse it by sonication on ice, then incubate on ice for 30 minutes. 2. Adherent cell: Aspirate the culture medium and wash the cells with ice-cold PBS twice. Lyse the cells by adding an appropriate volume of RIPA/NP-40 Lysis Buffer (containing Protease Inhibitor Cocktail) , sonicate to lyse the cells, and incubate on ice for 30 minutes. 3. Suspension cell: Transfer the culture medium to a pre-cooled centrifuge tube. Centrifuge and aspirate the supernatant. Wash the cells with ice-cold PBS twice. Lyse the cells by adding an appropriate volume of RIPA/NP-40 Lysis Buffer (containing Protease Inhibitor Cocktail) , sonicate to lyse the cells, and incubate on ice for 30 minutes. 4. Place the lysate into a pre-cooled microcentrifuge tube. Centrifuge at 4°C for 15 min. Collect the supernatant;
5. Remove a small volume of lysate to determine the protein concentration;
6. Combine the lysate with protein loading buffer. Boil 20 µL sample under 95-100°C for 5 min. Centrifuge for 5 min after cool down on ice.
Electrophoretic separation
1. According to the concentration of extracted protein, load appropriate amount of protein sample and marker onto SDS-PAGE gels for electrophoresis. Recommended separating gel (lower gel) concentration: 10%. Reference Table for Selecting SDS-PAGE Separation Gel Concentrations 2. Power up 80V for 30 minutes. Then the power supply is adjusted (110 V~150 V), the Marker is observed, and the electrophoresis can be stopped when the indicator band of the predyed protein Marker where the protein is located is properly separated. (Note that the current should not be too large when electrophoresis, too large current (more than 150 mA) will cause the temperature to rise, affecting the result of running glue. If high currents cannot be avoided, an ice bath can be used to cool the bath.)
Transfer membrane
1. Take out the converter, soak the clip and consumables in the pre-cooled converter;
2. Activate PVDF membrane with methanol for 1 min and rinse with transfer buffer;
3. Install it in the order of "black edge of clip - sponge - filter paper - filter paper - glue -PVDF membrane - filter paper - filter paper - sponge - white edge of clip"; 4. The protein was electrotransferred to PVDF membrane. ( 0.45 µm PVDF membrane is recommended ) Reference Table for Selecting PVDF Membrane Pore Size Specifications Recommended conditions for wet transfer: 200 mA, 60 min. ( Note that the transfer conditions can be adjusted according to the protein size. For high-molecular-weight proteins, a higher current and longer transfer time are recommended. However, ensure that the transfer tank remains at a low temperature to prevent gel melting.)
Block
1. After electrotransfer, wash the film with TBST at room temperature for 5 minutes;
2. Incubate the film in the blocking solution for 1 hour at room temperature;
3. Wash the film with TBST for 3 times, 5 minutes each time.
Antibody incubation
1. Use primary antibody dilution buffer to prepare the primary antibody working liquid (recommended dilution ratio for primary antibody 1:1000), gently shake and incubate with the film at 4°C overnight; 2. Wash the film with TBST 3 times, 5 minutes each time;
3. Add the secondary antibody to the blocking solution and incubate with the film gently at room temperature for 1 hour;
4. After incubation, wash the film with TBST 3 times for 5 minutes each time.
Antibody staining
1. Add the prepared ECL luminescent substrate (or select other color developing substrate according to the second antibody) and mix evenly;
2. Incubate with the film for 1 minute, remove excess substrate (keep the film moist), wrap with plastic film, and expose in the imaging system.
|
| IHC |
Experimental Protocol:
Deparaffinization/Rehydration
1. Deparaffinize/hydrate sections:
2. Incubate sections in three washes of xylene for 5 min each.
3. Incubate sections in two washes of 100% ethanol for 10 min each.
4. Incubate sections in two washes of 95% ethanol for 10 min each.
5. Wash sections two times in dH2O for 5 min each.
6.Antigen retrieval: For Citrate: Heat slides in a microwave submersed in 1X citrate unmasking solution until boiling is initiated; continue with 10 min at a sub-boiling temperature (95°-98°C). Cool slides on bench top for 30 min.
Staining
1. Wash sections in dH2O three times for 5 min each.
2. Incubate sections in 3% hydrogen peroxide for 10 min.
3. Wash sections in dH2O two times for 5 min each.
4. Wash sections in wash buffer for 5 min.
5. Block each section with 100–400 µl of blocking solution for 1 hr at room temperature.
6. Remove blocking solution and add 100–400 µl primary antibody diluent in to each section. Incubate overnight at 4°C.
7. Remove antibody solution and wash sections with wash buffer three times for 5 min each.
8. Cover section with 1–3 drops HRPas needed. Incubate in a humidified chamber for 30 min at room temperature.
9. Wash sections three times with wash buffer for 5 min each.
10. Add DAB Chromogen Concentrate to DAB Diluent and mix well before use.
11. Apply 100–400 µl DAB to each section and monitor closely. 1–10 min generally provides an acceptable staining intensity.
12. Immerse slides in dH2O.
13. If desired, counterstain sections with hematoxylin.
14. Wash sections in dH2O two times for 5 min each.
15. Dehydrate sections: Incubate sections in 95% ethanol two times for 10 sec each; Repeat in 100% ethanol, incubating sections two times for 10 sec each; Repeat in xylene, incubating sections two times for 10 sec each.
16. Mount sections with coverslips and mounting medium.
|
| IF |
Experimental Protocol:
Sample Preparation
1. Adherent Cells: Place a clean, sterile coverslip in a culture dish. Once the cells grow to near confluence as a monolayer, remove the coverslip for further use.
2. Suspension Cells: Seed the cells onto a clean, sterile slide coated with poly-L-lysine.
3. Frozen Sections: Allow the slide to thaw at room temperature. Wash it with pure water or PBS for 2 times, 3 minutes each time.
4. Paraffin Sections: Deparaffinization and rehydration. Wash the slide with pure water or PBS for 3 times, 3 minutes each time. Then perform antigen retrieval.
Fixation
1. Fix the cell coverslips/spots or tissue sections at room temperature using a fixative such as 4% paraformaldehyde (4% PFA) for 10-15 minutes.
2. Wash the sample with PBS for 3 times, 3 minutes each time.
Permeabilization
1.Add a detergent such as 0.1–0.3% Triton X-100 to the sample and incubate at room temperature for 10–20 minutes.
(Note: This step is only required for intracellular antigens. For antigens expressed on the cell membrane, this step is unnecessary.)
Wash the sample with PBS for 3 times, 3 minutes each time.
Blocking
Add blocking solution and incubate at room temperature for at least 1 hour. (Common blocking solutions include: serum from the same source as the secondary antibody, BSA, or goat serum.)
Note: Ensure the sample remains moist during and after the blocking step to prevent drying, which can lead to high background.
Immunofluorescence Staining (Day 1)
1. Remove the blocking solution and add the diluted primary antibody.
2. Incubate the sample in a humidified chamber at 4°C overnight.
Immunofluorescence Staining (Day 2)
1. Remove the primary antibody and wash with PBST for 3 times, 5 minutes each time.
2. Add the diluted fluorescent secondary antibody and incubate in the dark at 4°C for 1–2 hours.
3. Remove the secondary antibody and wash with PBST for 3 times, 5 minutes each time.
4. Add diluted DAPI and incubate at room temperature in the dark for 5–10 minutes.
5. Wash with PBST for 3 times, 5 minutes each time.
Mounting
1. Mount the sample with an anti-fade mounting medium.
2. Allow the slide to dry at room temperature overnight in the dark.
3. Store the slide in a slide storage box at 4°C, protected from light.
|
References
|
Application Data
WB
Validated by Selleck
-
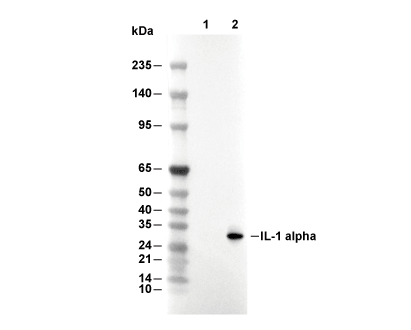 Lane 1: RAW 264.7, Lane 2: RAW 264.7 (LPS, 1 μg/mL, 7 h)