
|
受注:045-509-1970 |
技術サポート:tech@selleck.co.jp 平日9:00〜18:00 1営業日以内にご連絡を差し上げます |
生物学的記述
| Specificity | JNK1 + JNK2 + JNK3 Antibody (Rabbit mAb) [G2M15] detects endogenous levels of total JNK1, JNK2 and JNK3 protein. |
|---|---|
| Background | JNK1, JNK2, and JNK3 belong to the stress-activated branch of the mitogen-activated protein kinase family, existing as multiple splice variants, four each for JNK1 and JNK2 and two for JNK3, with JNK1 and JNK2 broadly expressed while JNK3 expression is largely restricted to brain, cardiac tissue, and testis. All three isoforms require dual phosphorylation on a conserved threonine-proline-tyrosine motif within their activation loop to become active, and this phosphorylation is carried out by two upstream dual-specificity kinases, MKK4 and MKK7, which show distinct substrate preferences: MKK4 phosphorylates JNK preferentially on tyrosine while MKK7 phosphorylates preferentially on threonine, and phosphorylation on threonine alone by MKK7 produces only partial JNK activation, with maximal activity requiring the combined action of both kinases on both residues of the T-P-Y motif. MKK4 and MKK7 are themselves engaged by distinct extracellular stimuli, with MKK7 specifically required for JNK activation in response to the pro-inflammatory cytokines TNF-alpha and IL-1, establishing MKK7 as an essential, non-redundant component of the cytokine-responsive branch of this pathway even though MKK4 and MKK7 can both activate JNK when tested directly in vitro. Because MKK4 and MKK7 are shared upstream activators for other MAP kinase pathways as well, pathway specificity is enforced through scaffold proteins of the JIP family, JIP1, JIP2, and JIP3, which physically tether specific combinations of an upstream MAP3K such as MLK3, one or both MKKs, and a particular JNK isoform into a single signaling module; reconstitution experiments show that JIP1 and JIP2 markedly enhance JNK activation driven by MLK3 specifically when co-expressed together with the relevant JNK isoform, directly demonstrating that scaffold assembly, rather than kinase concentration alone, determines efficient signal transmission through this cascade. Once activated, JNK phosphorylates c-Jun, driving AP-1-dependent transcription, and also directly phosphorylates and activates the pro-apoptotic Bcl-2 family members Bax, Bid, and Bim, triggering cytochrome c and Smac/Diablo release from mitochondria and subsequent caspase activation through the apoptosome, positioning JNK-driven apoptosis as a defined downstream consequence of sustained kinase activation under cellular stress. |
使用情報
| Application | WB, IP, IF, FCM | Dilution |
|
||||||||
|---|---|---|---|---|---|---|---|---|---|---|---|
| Reactivity | Mouse, Rat, Human | ||||||||||
| Source | Rabbit Monoclonal Antibody | MW | 48 kDa | ||||||||
| Storage Buffer | PBS, pH 7.2+50% Glycerol+0.05% BSA+0.01% NaN3 | Storage (from the date of receipt) |
-20°C (avoid freeze-thaw cycles), 2 years | ||||||||
| WB |
Experimental Protocol:
Sample preparation
1. Tissue: Lyse the tissue sample by adding an appropriate volume of ice-cold RIPA/NP-40 Lysis Buffer (containing Protease Inhibitor Cocktail),and homogenize the tissue at a low temperature or lyse it by sonication on ice, then incubate on ice for 30 minutes. 2. Adherent cell: Aspirate the culture medium and wash the cells with ice-cold PBS twice. Lyse the cells by adding an appropriate volume of RIPA/NP-40 Lysis Buffer (containing Protease Inhibitor Cocktail) , sonicate to lyse the cells, and incubate on ice for 30 minutes. 3. Suspension cell: Transfer the culture medium to a pre-cooled centrifuge tube. Centrifuge and aspirate the supernatant. Wash the cells with ice-cold PBS twice. Lyse the cells by adding an appropriate volume of RIPA/NP-40 Lysis Buffer (containing Protease Inhibitor Cocktail) , sonicate to lyse the cells, and incubate on ice for 30 minutes. 4. Place the lysate into a pre-cooled microcentrifuge tube. Centrifuge at 4°C for 15 min. Collect the supernatant;
5. Remove a small volume of lysate to determine the protein concentration;
6. Combine the lysate with protein loading buffer. Boil 20 µL sample under 95-100°C for 5 min. Centrifuge for 5 min after cool down on ice.
Electrophoretic separation
1. According to the concentration of extracted protein, load appropriate amount of protein sample and marker onto SDS-PAGE gels for electrophoresis. Recommended separating gel (lower gel) concentration: 10%. Reference Table for Selecting SDS-PAGE Separation Gel Concentrations 2. Power up 80V for 30 minutes. Then the power supply is adjusted (110 V~150 V), the Marker is observed, and the electrophoresis can be stopped when the indicator band of the predyed protein Marker where the protein is located is properly separated. (Note that the current should not be too large when electrophoresis, too large current (more than 150 mA) will cause the temperature to rise, affecting the result of running glue. If high currents cannot be avoided, an ice bath can be used to cool the bath.)
Transfer membrane
1. Take out the converter, soak the clip and consumables in the pre-cooled converter;
2. Activate PVDF membrane with methanol for 1 min and rinse with transfer buffer;
3. Install it in the order of "black edge of clip - sponge - filter paper - filter paper - glue -PVDF membrane - filter paper - filter paper - sponge - white edge of clip"; 4. The protein was electrotransferred to PVDF membrane. ( 0.45 µm PVDF membrane is recommended ) Reference Table for Selecting PVDF Membrane Pore Size Specifications Recommended conditions for wet transfer: 200 mA, 120 min. ( Note that the transfer conditions can be adjusted according to the protein size. For high-molecular-weight proteins, a higher current and longer transfer time are recommended. However, ensure that the transfer tank remains at a low temperature to prevent gel melting.)
Block
1. After electrotransfer, wash the film with TBST at room temperature for 5 minutes;
2. Incubate the film in the blocking solution for 1 hour at room temperature;
3. Wash the film with TBST for 3 times, 5 minutes each time.
Antibody incubation
1. Use primary antibody dilution buffer to prepare the primary antibody working liquid (recommended dilution ratio for primary antibody 1:2000), gently shake and incubate with the film at 4°C overnight; 2. Wash the film with TBST 3 times, 5 minutes each time;
3. Add the secondary antibody to the blocking solution and incubate with the film gently at room temperature for 1 hour;
4. After incubation, wash the film with TBST 3 times for 5 minutes each time.
Antibody staining
1. Add the prepared ECL luminescent substrate (or select other color developing substrate according to the second antibody) and mix evenly;
2. Incubate with the film for 1 minute, remove excess substrate (keep the film moist), wrap with plastic film, and expose in the imaging system.
|
| IF |
Experimental Protocol:
Sample Preparation
1. Adherent Cells: Place a clean, sterile coverslip in a culture dish. Once the cells grow to near confluence as a monolayer, remove the coverslip for further use.
2. Suspension Cells: Seed the cells onto a clean, sterile slide coated with poly-L-lysine.
3. Frozen Sections: Allow the slide to thaw at room temperature. Wash it with pure water or PBS for 2 times, 3 minutes each time.
4. Paraffin Sections: Deparaffinization and rehydration. Wash the slide with pure water or PBS for 3 times, 3 minutes each time. Then perform antigen retrieval.
Fixation
1. Fix the cell coverslips/spots or tissue sections at room temperature using a fixative such as 4% paraformaldehyde (4% PFA) for 10-15 minutes.
2. Wash the sample with PBS for 3 times, 3 minutes each time.
Permeabilization
1.Add a detergent such as 0.1–0.3% Triton X-100 to the sample and incubate at room temperature for 10–20 minutes.
(Note: This step is only required for intracellular antigens. For antigens expressed on the cell membrane, this step is unnecessary.)
Wash the sample with PBS for 3 times, 3 minutes each time.
Blocking
Add blocking solution and incubate at room temperature for at least 1 hour. (Common blocking solutions include: serum from the same source as the secondary antibody, BSA, or goat serum.)
Note: Ensure the sample remains moist during and after the blocking step to prevent drying, which can lead to high background.
Immunofluorescence Staining (Day 1)
1. Remove the blocking solution and add the diluted primary antibody.
2. Incubate the sample in a humidified chamber at 4°C overnight.
Immunofluorescence Staining (Day 2)
1. Remove the primary antibody and wash with PBST for 3 times, 5 minutes each time.
2. Add the diluted fluorescent secondary antibody and incubate in the dark at 4°C for 1–2 hours.
3. Remove the secondary antibody and wash with PBST for 3 times, 5 minutes each time.
4. Add diluted DAPI and incubate at room temperature in the dark for 5–10 minutes.
5. Wash with PBST for 3 times, 5 minutes each time.
Mounting
1. Mount the sample with an anti-fade mounting medium.
2. Allow the slide to dry at room temperature overnight in the dark.
3. Store the slide in a slide storage box at 4°C, protected from light.
|
References
|
Application Data
WB
Validated by Selleck
-
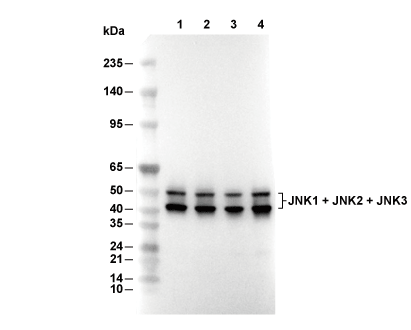 Lane 1: Jurkat, Lane 2: Hela, Lane 3: RAW 264.7, Lane 4: PC12