
|
受注:045-509-1970 |
技術サポート:tech@selleck.co.jp 平日9:00〜18:00 1営業日以内にご連絡を差し上げます |
生物学的記述
| Specificity | Phospho-SF3B1 (Thr313) Antibody (Rabbit mAb) [K13E21] detects endogenous levels of total SF3B1 protein only when it is phosphorylated at Thr313. |
|---|---|
| Background | Threonine 313 is one of a cluster of threonine-proline motifs located in the N-terminal region of SF3B1, a core subunit of the U2 small nuclear ribonucleoprotein, and phosphorylation at this and neighboring TP motifs occurs specifically during activation of the spliceosome, the process by which the pre-catalytic spliceosome is converted into a catalytically competent complex capable of intron removal. Cyclin-dependent kinase 11 (CDK11) was identified as the kinase responsible for this SF3B1 N-terminal phosphorylation, resolving a previously unknown gap in understanding spliceosome activation, since phosphorylation of SF3B1 during this transition had been observed for years without the responsible kinase being identified; CDK11 directly associates with SF3B1 and phosphorylates its N-terminal threonine residues, including Thr313, specifically during the activation step. This phosphorylation is functionally required for the SF3B1-containing spliceosome to properly engage the U5 and U6 small nuclear RNAs within the activated spliceosome, termed the Bact complex, and pharmacologically inhibiting CDK11 with the small-molecule inhibitor OTS964 blocks this phosphorylation and prevents spliceosome activation, causing widespread intron retention and accumulation of non-functional, arrested spliceosome complexes on chromatin-associated pre-mRNAs rather than allowing splicing to proceed through an alternative route. Downstream of this CDK11-mediated phosphorylation event, phosphorylated SF3B1 recruits the protein SNIP1 together with the RES complex to the activating spliceosome, and this SNIP1-dependent recruitment step is itself required for successful spliceosome activation, establishing a defined signaling sequence in which CDK11 phosphorylates SF3B1's N-terminal TP motifs, phosphorylated SF3B1 recruits SNIP1 and the RES complex, and this recruitment then permits the structural transition to the catalytically active spliceosome. Because this CDK11-SF3B1 phosphorylation axis is essential for accurate pre-mRNA splicing and cell survival, and because SF3B1 is itself among the most frequently mutated splicing factors in cancer, phosphorylation at sites including Thr313 serves as a marker of active spliceosome engagement and positions this regulatory axis as a potential point of therapeutic intervention in cancers driven by dysregulated splicing. |
使用情報
| Application | WB | Dilution |
|
||
|---|---|---|---|---|---|
| Reactivity | Human, Mouse | ||||
| Source | Rabbit Monoclonal Antibody | MW | 146 kDa | ||
| Storage Buffer | PBS, pH 7.2+50% Glycerol+0.05% BSA+0.01% NaN3 | Storage (from the date of receipt) |
-20°C (avoid freeze-thaw cycles), 2 years | ||
| WB |
Experimental Protocol:
Sample preparation
1. Tissue: Lyse the tissue sample by adding an appropriate volume of ice-cold RIPA/NP-40 Lysis Buffer (containing Protease Inhibitor Cocktail, Phosphatase Inhibitor Cocktail),and homogenize the tissue at a low temperature or lyse it by sonication on ice, then incubate on ice for 30 minutes. 2. Adherent cell: Aspirate the culture medium and wash the cells with ice-cold PBS twice. Lyse the cells by adding an appropriate volume of RIPA/NP-40 Lysis Buffer (containing Protease Inhibitor Cocktail, Phosphatase Inhibitor Cocktail) , sonicate to lyse the cells, and incubate on ice for 30 minutes. 3. Suspension cell: Transfer the culture medium to a pre-cooled centrifuge tube. Centrifuge and aspirate the supernatant. Wash the cells with ice-cold PBS twice. Lyse the cells by adding an appropriate volume of RIPA/NP-40 Lysis Buffer (containing Protease Inhibitor Cocktail, Phosphatase Inhibitor Cocktail) , sonicate to lyse the cells, and incubate on ice for 30 minutes. 4. Place the lysate into a pre-cooled microcentrifuge tube. Centrifuge at 4°C for 15 min. Collect the supernatant;
5. Remove a small volume of lysate to determine the protein concentration;
6. Combine the lysate with protein loading buffer. Boil 20 µL sample under 95-100°C for 5 min. Centrifuge for 5 min after cool down on ice.
Electrophoretic separation
1. According to the concentration of extracted protein, load appropriate amount of protein sample and marker onto SDS-PAGE gels for electrophoresis. Recommended separating gel (lower gel) concentration: 5%. Reference Table for Selecting SDS-PAGE Separation Gel Concentrations 2. Power up 80V for 30 minutes. Then the power supply is adjusted (110 V~150 V), the Marker is observed, and the electrophoresis can be stopped when the indicator band of the predyed protein Marker where the protein is located is properly separated. (Note that the current should not be too large when electrophoresis, too large current (more than 150 mA) will cause the temperature to rise, affecting the result of running glue. If high currents cannot be avoided, an ice bath can be used to cool the bath.)
Transfer membrane
1. Take out the converter, soak the clip and consumables in the pre-cooled converter;
2. Activate PVDF membrane with methanol for 1 min and rinse with transfer buffer;
3. Install it in the order of "black edge of clip - sponge - filter paper - filter paper - glue -PVDF membrane - filter paper - filter paper - sponge - white edge of clip"; 4. The protein was electrotransferred to PVDF membrane. ( 0.45 µm PVDF membrane is recommended ) Reference Table for Selecting PVDF Membrane Pore Size Specifications Recommended conditions for wet transfer: 200 mA, 120 min. ( Note that the transfer conditions can be adjusted according to the protein size. For high-molecular-weight proteins, a higher current and longer transfer time are recommended. However, ensure that the transfer tank remains at a low temperature to prevent gel melting.)
Block
1. After electrotransfer, wash the film with TBST at room temperature for 5 minutes;
2. Incubate the film in the blocking solution ( recommending 5% BSA solution)
for 1 hour at room temperature;
3. Wash the film with TBST for 3 times, 5 minutes each time.
Antibody incubation
1. Use primary antibody dilution buffer to prepare the primary antibody working liquid (recommended dilution ratio for primary antibody 1:1000), gently shake and incubate with the film at 4°C overnight; 2. Wash the film with TBST 3 times, 5 minutes each time;
3. Add the secondary antibody to the blocking solution and incubate with the film gently at room temperature for 1 hour;
4. After incubation, wash the film with TBST 3 times for 5 minutes each time.
Antibody staining
1. Add the prepared ECL luminescent substrate (or select other color developing substrate according to the second antibody) and mix evenly;
2. Incubate with the film for 1 minute, remove excess substrate (keep the film moist), wrap with plastic film, and expose in the imaging system.
|
References
|
Application Data
WB
Validated by Selleck
-
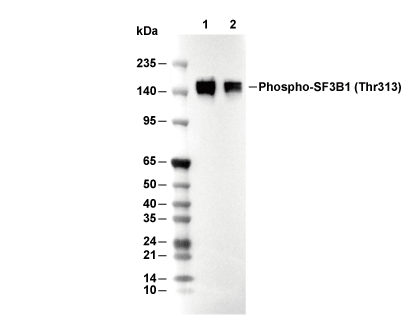 Lane 1: Hela, Lane 2: 3T3