
|
受注:045-509-1970 |
技術サポート:tech@selleck.co.jp 平日9:00〜18:00 1営業日以内にご連絡を差し上げます |
生物学的記述
| Specificity | Phospho-SQSTM1/p62 (Ser349) Antibody (Rabbit mAb) [N16A3] detects endogenous levels of total SQSTM1/p62 protein only when it is phosphorylated at Ser349. |
|---|---|
| Background | Phospho‑SQSTM1/p62 (Ser349) denotes the active, signal-integrating form of the autophagy adaptor SQSTM1/p62 in which a serine residue within the KEAP1-binding region is phosphorylated, enhancing the protein’s ability to couple selective autophagy with redox-responsive transcriptional control. SQSTM1/p62 is a modular scaffold with an N‑terminal PB1 domain that mediates self-oligomerization, central LC3-interacting and KEAP1-interacting regions, and a C‑terminal ubiquitin-associated domain, allowing it to assemble phase‑separated droplets that concentrate polyubiquitinated cargo, autophagy machinery, and signaling components. Phosphorylation at Ser349 (Ser351 in mouse) occurs within the KEAP1-interacting region and increases the affinity of p62 for KEAP1, promoting competitive binding that displaces NRF2 from the KEAP1–CUL3 ubiquitin ligase complex and stabilizes NRF2, which then accumulates in the nucleus and activates transcription of antioxidant and cytoprotective genes. This modification is induced during oxidative stress and integrates with additional phosphorylation events such as Ser403, which strengthens binding to polyubiquitin chains, so that Ser349‑phosphorylated p62 droplets function as platforms where ubiquitinated cargo, KEAP1, and autophagy factors converge, coordinating NRF2 activation with cargo sequestration and autophagic degradation. Phospho‑p62 (Ser349) thereby marks a state in which p62 not only serves as a receptor for selective autophagy of ubiquitinated proteins, protein aggregates, and damaged organelles, but also actively rewires the KEAP1–NRF2 axis toward an antioxidant and pro-survival transcriptional program, a coupling that contributes to adaptation under chronic stress. In cancer, persistent or elevated Ser349 phosphorylation associates with increased NRF2 activity, resistance to anticancer drugs, and enhanced proliferative capacity of hepatocellular carcinoma and other tumor cells, and phospho‑Ser349 p62 is enriched in p62-positive inclusion bodies where it supports both survival signaling and altered proteostasis, making this epitope a useful readout of NRF2‑linked autophagy signaling in oncogenic contexts. |
使用情報
| Application | WB, IP, IF, FCM | Dilution |
|
||||||||
|---|---|---|---|---|---|---|---|---|---|---|---|
| Reactivity | Mouse, Rat, Human | ||||||||||
| Source | Rabbit Monoclonal Antibody | MW | 48 kDa | ||||||||
| Storage Buffer | PBS, pH 7.2+50% Glycerol+0.05% BSA+0.01% NaN3 | Storage (from the date of receipt) |
-20°C (avoid freeze-thaw cycles), 2 years | ||||||||
| WB |
Experimental Protocol:
Sample preparation
1. Tissue: Lyse the tissue sample by adding an appropriate volume of ice-cold RIPA/NP-40 Lysis Buffer (containing Protease Inhibitor Cocktail, Phosphatase Inhibitor Cocktail),and homogenize the tissue at a low temperature or lyse it by sonication on ice, then incubate on ice for 30 minutes. 2. Adherent cell: Aspirate the culture medium and wash the cells with ice-cold PBS twice. Lyse the cells by adding an appropriate volume of RIPA/NP-40 Lysis Buffer (containing Protease Inhibitor Cocktail, Phosphatase Inhibitor Cocktail) , sonicate to lyse the cells, and incubate on ice for 30 minutes. 3. Suspension cell: Transfer the culture medium to a pre-cooled centrifuge tube. Centrifuge and aspirate the supernatant. Wash the cells with ice-cold PBS twice. Lyse the cells by adding an appropriate volume of RIPA/NP-40 Lysis Buffer (containing Protease Inhibitor Cocktail, Phosphatase Inhibitor Cocktail) , sonicate to lyse the cells, and incubate on ice for 30 minutes. 4. Place the lysate into a pre-cooled microcentrifuge tube. Centrifuge at 4°C for 15 min. Collect the supernatant;
5. Remove a small volume of lysate to determine the protein concentration;
6. Combine the lysate with protein loading buffer. Boil 20 µL sample under 95-100°C for 5 min. Centrifuge for 5 min after cool down on ice.
Electrophoretic separation
1. According to the concentration of extracted protein, load appropriate amount of protein sample and marker onto SDS-PAGE gels for electrophoresis. Recommended separating gel (lower gel) concentration: 10%. Reference Table for Selecting SDS-PAGE Separation Gel Concentrations 2. Power up 80V for 30 minutes. Then the power supply is adjusted (110 V~150 V), the Marker is observed, and the electrophoresis can be stopped when the indicator band of the predyed protein Marker where the protein is located is properly separated. (Note that the current should not be too large when electrophoresis, too large current (more than 150 mA) will cause the temperature to rise, affecting the result of running glue. If high currents cannot be avoided, an ice bath can be used to cool the bath.)
Transfer membrane
1. Take out the converter, soak the clip and consumables in the pre-cooled converter;
2. Activate PVDF membrane with methanol for 1 min and rinse with transfer buffer;
3. Install it in the order of "black edge of clip - sponge - filter paper - filter paper - glue -PVDF membrane - filter paper - filter paper - sponge - white edge of clip"; 4. The protein was electrotransferred to PVDF membrane. ( 0.45 µm PVDF membrane is recommended ) Reference Table for Selecting PVDF Membrane Pore Size Specifications Recommended conditions for wet transfer: 200 mA, 120 min. ( Note that the transfer conditions can be adjusted according to the protein size. For high-molecular-weight proteins, a higher current and longer transfer time are recommended. However, ensure that the transfer tank remains at a low temperature to prevent gel melting.)
Block
1. After electrotransfer, wash the film with TBST at room temperature for 5 minutes;
2. Incubate the film in the blocking solution ( recommending 5% BSA solution)
for 1 hour at room temperature;
3. Wash the film with TBST for 3 times, 5 minutes each time.
Antibody incubation
1. Use primary antibody dilution buffer to prepare the primary antibody working liquid (recommended dilution ratio for primary antibody 1:1000), gently shake and incubate with the film at 4°C overnight; 2. Wash the film with TBST 3 times, 5 minutes each time;
3. Add the secondary antibody to the blocking solution and incubate with the film gently at room temperature for 1 hour;
4. After incubation, wash the film with TBST 3 times for 5 minutes each time.
Antibody staining
1. Add the prepared ECL luminescent substrate (or select other color developing substrate according to the second antibody) and mix evenly;
2. Incubate with the film for 1 minute, remove excess substrate (keep the film moist), wrap with plastic film, and expose in the imaging system.
|
| IF |
Experimental Protocol:
Sample Preparation
1. Adherent Cells: Place a clean, sterile coverslip in a culture dish. Once the cells grow to near confluence as a monolayer, remove the coverslip for further use.
2. Suspension Cells: Seed the cells onto a clean, sterile slide coated with poly-L-lysine.
3. Frozen Sections: Allow the slide to thaw at room temperature. Wash it with pure water or PBS for 2 times, 3 minutes each time.
4. Paraffin Sections: Deparaffinization and rehydration. Wash the slide with pure water or PBS for 3 times, 3 minutes each time. Then perform antigen retrieval.
Fixation
1. Fix the cell coverslips/spots or tissue sections at room temperature using a fixative such as 4% paraformaldehyde (4% PFA) for 10-15 minutes.
2. Wash the sample with PBS for 3 times, 3 minutes each time.
Permeabilization
1.Add a detergent such as 0.1–0.3% Triton X-100 to the sample and incubate at room temperature for 10–20 minutes.
(Note: This step is only required for intracellular antigens. For antigens expressed on the cell membrane, this step is unnecessary.)
Wash the sample with PBS for 3 times, 3 minutes each time.
Blocking
Add blocking solution and incubate at room temperature for at least 1 hour. (Common blocking solutions include: serum from the same source as the secondary antibody, BSA, or goat serum.)
Note: Ensure the sample remains moist during and after the blocking step to prevent drying, which can lead to high background.
Immunofluorescence Staining (Day 1)
1. Remove the blocking solution and add the diluted primary antibody.
2. Incubate the sample in a humidified chamber at 4°C overnight.
Immunofluorescence Staining (Day 2)
1. Remove the primary antibody and wash with PBST for 3 times, 5 minutes each time.
2. Add the diluted fluorescent secondary antibody and incubate in the dark at 4°C for 1–2 hours.
3. Remove the secondary antibody and wash with PBST for 3 times, 5 minutes each time.
4. Add diluted DAPI and incubate at room temperature in the dark for 5–10 minutes.
5. Wash with PBST for 3 times, 5 minutes each time.
Mounting
1. Mount the sample with an anti-fade mounting medium.
2. Allow the slide to dry at room temperature overnight in the dark.
3. Store the slide in a slide storage box at 4°C, protected from light.
|
References
|
Application Data
WB
Validated by Selleck
-
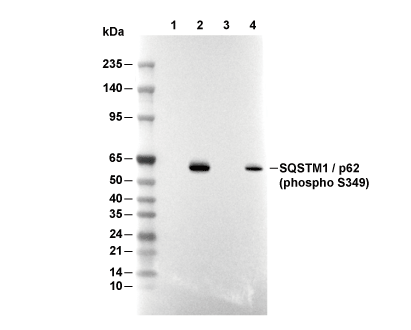 Lane 1: U-2 OS, Lane 2: U-2 OS (KO SQSTM1), Lane 3: HeLa, Lane 4: HeLa (MG-132, 2μM, 18 h)