
- 阻害剤
- 研究分野別
- PI3K/Akt/mTOR
- Epigenetics
- Methylation
- Immunology & Inflammation
- Protein Tyrosine Kinase
- Angiogenesis
- Apoptosis
- Autophagy
- ER stress & UPR
- JAK/STAT
- MAPK
- Cytoskeletal Signaling
- Cell Cycle
- TGF-beta/Smad
- 化合物ライブラリー
- 抗体
- 新製品
- お問い合わせ

CDX2 Antibody (Rabbit mAb) [C20G4]
CatNo: F1324
Application:
Reactivity:
-
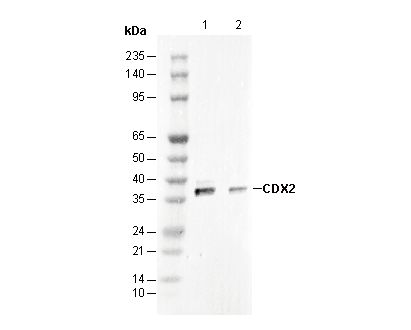 Lane 1: HCT116 , Lane 2: Hela
 -
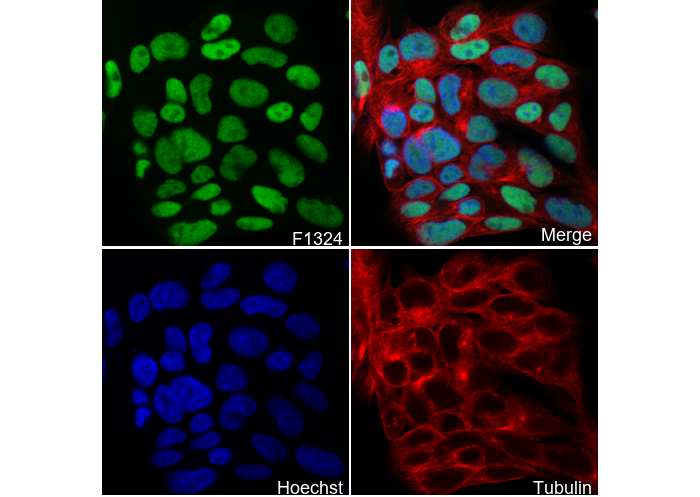 Immunofluorescent analysis of DLD cells using F1324 (green, 1:50), Hoechst (blue) and tubulin (Red).
文献中Selleckの製品使用例(1)
キーポイント
WB
転写条件(ウェット): 200 mA, 60 min。
転写条件(ウェット): 200 mA, 60 min。
使用情報
| Dilution |
|---|
|
| Application |
|---|
| WB, IP, IHC, IF |
| Source |
|---|
| Rabbit Monoclonal Antibody |
| Reactivity |
|---|
| Human |
| Storage Buffer |
|---|
| PBS, pH 7.2+50% Glycerol+0.05% BSA+0.01% NaN₃ |
| Storage (from the date of receipt) |
|---|
| –20°C (avoid freeze-thaw cycles), 2 years |
| Predicted MW |
|---|
| 34 kDa |
| ポジティブコントロール | HCT116; HCT-15; DLD-1 |
|---|---|
| ネガティブコントロール |
プロトコール
| WB |
|---|
Experimental Protocol:
Sample preparation
1. Tissue: Lyse the tissue sample by adding an appropriate volume of ice-cold RIPA/Nuclear Lysis Buffer (containing Protease Inhibitor Cocktail),and homogenize the tissue at a low temperature or lyse it by sonication on ice, then incubate on ice for 30 minutes. 2. Adherent cell: Aspirate the culture medium and transfer the cells into an EP tube. Wash the cells with ice-cold PBS twice. Add an appropriate volume of RIPA/Nuclear Lysis Buffer (containing Protease Inhibitor Cocktail), sonicate to lyse the cells, and incubate on ice for 30 minutes. 3. Suspension cell: Transfer the culture medium to a pre-cooled centrifuge tube. Centrifuge and aspirate the supernatant. Wash the cells with ice-cold PBS twice.Add an appropriate volume of RIPA/Nuclear Lysis Buffer (containing Protease Inhibitor Cocktail), sonicate to lyse the cells, and incubate on ice for 30 minutes. 4. Place the lysate into a pre-cooled microcentrifuge tube. Centrifuge at 4°C for 15 min. Collect the supernatant;
5. Remove a small volume of lysate to determine the protein concentration;
6. Combine the lysate with protein loading buffer. Boil 20 µL sample under 95-100°C for 5 min. Centrifuge for 5 min after cool down on ice.
Electrophoretic separation
1. According to the concentration of extracted protein, load appropriate amount of protein sample and marker onto SDS-PAGE gels for electrophoresis. Recommended separating gel (lower gel) concentration: 10%. Reference Table for Selecting SDS-PAGE Separation Gel Concentrations 2. Power up 80V for 30 minutes. Then the power supply is adjusted (110 V~150 V), the Marker is observed, and the electrophoresis can be stopped when the indicator band of the predyed protein Marker where the protein is located is properly separated. (Note that the current should not be too large when electrophoresis, too large current (more than 150 mA) will cause the temperature to rise, affecting the result of running glue. If high currents cannot be avoided, an ice bath can be used to cool the bath.)
Transfer membrane
1. Take out the converter, soak the clip and consumables in the pre-cooled converter;
2. Activate PVDF membrane with methanol for 1 min and rinse with transfer buffer;
3. Install it in the order of "black edge of clip - sponge - filter paper - filter paper - glue -PVDF membrane - filter paper - filter paper - sponge - white edge of clip"; 4. The protein was electrotransferred to PVDF membrane. ( 0.45 µm PVDF membrane is recommended ) Reference Table for Selecting PVDF Membrane Pore Size Specifications Recommended conditions for wet transfer: 200 mA, 60 min. ( Note that the transfer conditions can be adjusted according to the protein size. For high-molecular-weight proteins, a higher current and longer transfer time are recommended. However, ensure that the transfer tank remains at a low temperature to prevent gel melting.)
Block
1. After electrotransfer, wash the film with TBST at room temperature for 5 minutes;
2. Incubate the film in the blocking solution for 1 hour at room temperature;
3. Wash the film with TBST for 3 times, 5 minutes each time.
Antibody incubation
1. Use primary antibody dilution buffer to prepare the primary antibody working liquid (recommended dilution ratio for primary antibody 1:1000), gently shake and incubate with the film at 4°C overnight; 2. Wash the film with TBST 3 times, 5 minutes each time;
3. Add the secondary antibody to the blocking solution and incubate with the film gently at room temperature for 1 hour;
4. After incubation, wash the film with TBST 3 times for 5 minutes each time.
Antibody staining
740. Add the prepared ECL luminescent substrate (or select other color developing substrate according to the second antibody) and mix evenly;
2. Incubate with the film for 1 minute, remove excess substrate (keep the film moist), wrap with plastic film, and expose in the imaging system. |
| IF |
|---|
Experimental Protocol:
Sample Preparation
1. Adherent Cells: Place a clean, sterile coverslip in a culture dish. Once the cells grow to near confluence as a monolayer, remove the coverslip for further use.
2. Suspension Cells: Seed the cells onto a clean, sterile slide coated with poly-L-lysine.
3. Frozen Sections: Allow the slide to thaw at room temperature. Wash it with pure water or PBS for 2 times, 3 minutes each time.
4. Paraffin Sections: Deparaffinization and rehydration. Wash the slide with pure water or PBS for 3 times, 3 minutes each time. Then perform antigen retrieval.
Fixation
1. Fix the cell coverslips/spots or tissue sections at room temperature using a fixative such as 4% paraformaldehyde (4% PFA) for 10-15 minutes.
2. Wash the sample with PBS for 3 times, 3 minutes each time.
Permeabilization
1.Add a detergent such as 0.1–0.3% Triton X-100 to the sample and incubate at room temperature for 10–20 minutes.
(Note: This step is only required for intracellular antigens. For antigens expressed on the cell membrane, this step is unnecessary.)
Wash the sample with PBS for 3 times, 3 minutes each time.
Blocking
Add blocking solution and incubate at room temperature for at least 1 hour. (Common blocking solutions include: serum from the same source as the secondary antibody, BSA, or goat serum.)
Note: Ensure the sample remains moist during and after the blocking step to prevent drying, which can lead to high background.
Immunofluorescence Staining (Day 1)
1. Remove the blocking solution and add the diluted primary antibody.
2. Incubate the sample in a humidified chamber at 4°C overnight.
Immunofluorescence Staining (Day 2)
1. Remove the primary antibody and wash with PBST for 3 times, 5 minutes each time.
2. Add the diluted fluorescent secondary antibody and incubate in the dark at 4°C for 1–2 hours.
3. Remove the secondary antibody and wash with PBST for 3 times, 5 minutes each time.
4. Add diluted DAPI and incubate at room temperature in the dark for 5–10 minutes.
5. Wash with PBST for 3 times, 5 minutes each time.
Mounting
1. Mount the sample with an anti-fade mounting medium.
2. Allow the slide to dry at room temperature overnight in the dark.
3. Store the slide in a slide storage box at 4°C, protected from light.
|
| IHC |
|---|
Experimental Protocol:
Deparaffinization/Rehydration
1. Deparaffinize/hydrate sections:
2. Incubate sections in three washes of xylene for 5 min each.
3. Incubate sections in two washes of 100% ethanol for 10 min each.
4. Incubate sections in two washes of 95% ethanol for 10 min each.
5. Wash sections two times in dH2O for 5 min each.
6.Antigen retrieval: For Citrate: Heat slides in a microwave submersed in 1X citrate unmasking solution until boiling is initiated; continue with 10 min at a sub-boiling temperature (95°-98°C). Cool slides on bench top for 30 min.
Staining
1. Wash sections in dH2O three times for 5 min each.
2. Incubate sections in 3% hydrogen peroxide for 10 min.
3. Wash sections in dH2O two times for 5 min each.
4. Wash sections in wash buffer for 5 min.
5. Block each section with 100–400 µl of blocking solution for 1 hr at room temperature.
6. Remove blocking solution and add 100–400 µl primary antibody diluent in to each section. Incubate overnight at 4°C.
7. Remove antibody solution and wash sections with wash buffer three times for 5 min each.
8. Cover section with 1–3 drops HRPas needed. Incubate in a humidified chamber for 30 min at room temperature.
9. Wash sections three times with wash buffer for 5 min each.
10. Add DAB Chromogen Concentrate to DAB Diluent and mix well before use.
11. Apply 100–400 µl DAB to each section and monitor closely. 1–10 min generally provides an acceptable staining intensity.
12. Immerse slides in dH2O.
13. If desired, counterstain sections with hematoxylin.
14. Wash sections in dH2O two times for 5 min each.
15. Dehydrate sections: Incubate sections in 95% ethanol two times for 10 sec each; Repeat in 100% ethanol, incubating sections two times for 10 sec each; Repeat in xylene, incubating sections two times for 10 sec each.
16. Mount sections with coverslips and mounting medium.
|
| IP |
|---|
Experimental Procedure:
Reagents and Preparation
1. Basic buffers: 1× PBS or 1× TBS (pre-chilled on ice); 1× cell lysis buffer (add 1 mM PMSF protease inhibitor immediately before use; add phosphatase inhibitors for phosphoproteins).
2. Capture medium: Protein A/G magnetic beads or agarose beads (Sepharose beads).
3. Controls: Use an isotype control IgG matching the host species and IgG subclass of the primary antibody, at the same concentration. It is recommended to reserve a portion of the cell lysate that has not been subjected to immunoprecipitation as the Input control; if necessary, a beads-only control (beads added without antibody) may also be included.
4. Loading and elution reagents: 3× or 4× SDS sample loading buffer (containing DTT/reducing agent); if non-denaturing elution is to be performed, prepare the corresponding elution buffer and neutralization buffer separately; for denaturing elution, 1× PBS is typically used to dilute the 3× or 4× SDS sample loading buffer to 1×.
Cell Lysis and Sample Preparation (Native Protein Extraction)
1. Cell harvesting: Discard the culture medium and wash the cells once with ice-cold 1× PBS.
2. Cell lysis: Add 0.5–1 mL of ice-cold 1× cell lysis buffer to a 10-cm culture dish and incubate on ice for 5–10 minutes.
3. Lysate collection and clarification: Scrape the cells and transfer the lysate to a microcentrifuge tube. Some adherent cells may require detachment using digestive enzymes or mechanical methods. Centrifuge at 14,000 rpm at 4°C for 5–15 min. Collect the supernatant as the clarified cell lysate. It is recommended to determine the protein concentration.
Pre-clearing and Immunoprecipitation Reaction
1. Pre-clearing of the lysate (recommended): Take an appropriate amount of beads (magnetic beads or agarose beads) and pre-wash 2–3 times with cell lysis buffer or 1× TBS/PBS. After pre-washing, it is recommended to remove the wash buffer as completely as possible before adding subsequent reagents, to avoid extra dilution of the sample. For lysis systems containing detergents or specific salt concentrations, prefer pre-washing with a buffer identical or compatible with the lysis buffer to minimize buffer-system mismatches.
2. Pre-clearing treatment: Mix the cell lysate with the pre-washed beads and incubate with rotation at room temperature for 30–60 min, or at 4°C with rotation for 1–2 h.
When using agarose beads, pellet the beads by centrifugation after incubation and collect the supernatant.
When using magnetic beads, separate the beads using a magnetic stand after incubation and collect the supernatant.
This step removes proteins that bind non-specifically to the beads. For unstable proteins, phosphoproteins, or protein complexes, incubation at 4°C is preferred to minimize protein degradation, dephosphorylation, or complex dissociation. Beads used for pre-clearing should generally not be pre-coupled with a specific antibody, to avoid loss of the target antigen.
3. Formation of the “bead–antibody–antigen” immunocomplex
Either of the following two approaches may be used:
3.1 Pre-form the antibody–antigen complex, then add the beads: Add an appropriate amount of primary antibody to the pre-cleared supernatant obtained in step 2, and set up an isotype control IgG group in parallel. Incubate with rotation at 4°C overnight (recommended), or at room temperature with rotation for 2 h, to allow formation of the antibody–antigen complex.
In parallel, take an appropriate amount of beads and pre-wash them as described in step 1 of this section. Add the antibody–antigen complex to the pre-washed magnetic or agarose beads and incubate with rotation at room temperature for 30 min–1 h, or at 4°C with rotation for 1–2 h, to allow the antibody–antigen complex to bind efficiently to the beads.
3.2 Pre-form the bead–antibody complex, then add the cell lysate: Dilute the primary antibody in cell lysis buffer at the dilution ratio recommended in the antibody instruction manual to prepare the antibody working solution. Add an appropriate amount of pre-washed magnetic beads to the antibody working solution and incubate with rotation at room temperature for 15 min, or at 4°C with rotation for 1 h, to form the bead–antibody complex.
Recover the beads by magnetic separation or centrifugation, discard the supernatant, and pre-wash the beads 2–3 times with 1× TBS. Then add the cell lysate and incubate with rotation at 4°C overnight (recommended), or at room temperature with rotation for 2 h.
Washing of the Precipitate and Sample Elution
1. Once immunoprecipitation is complete, separate the beads according to their type and discard the supernatant.
Magnetic beads are separated using a magnetic stand.
For agarose beads, low-speed centrifugation (500–1000 rpm) appropriate for the bead specifications should be used, to avoid bead compaction or damage caused by high-speed centrifugation.
2. Washing the beads: Gently wash the beads 3–5 times with ice-cold 1× cell lysis buffer or 1× TBS/TBST. Keep the temperature low throughout the washes. After each addition of wash buffer, mix gently to fully resuspend the beads; then separate the beads using a magnetic stand or appropriate centrifugation, depending on the bead type, and remove the wash buffer thoroughly to minimize unbound and non-specifically bound components. During each wash, remove as much supernatant as possible while avoiding aspiration of the beads. After the final wash, remove residual wash buffer as completely as possible to prevent dilution of the eluate or interference with downstream analyses. Keep the samples on ice after each wash.
3. Sample elution (choose one of the following):
3.1 Denaturing direct elution (most commonly used): Add SDS sample loading buffer to the bead pellet to a final concentration of 1×. If 3× or 4× SDS sample loading buffer is used, it must first be diluted to 1×. Mix well and heat at 95–100°C for 5 minutes. Separate the beads and collect the supernatant for subsequent electrophoresis.
3.2 Chemical / non-denaturing elution (preserves protein activity): After the final wash, separate the beads using a magnetic stand or low-speed centrifugation, depending on the bead type, and remove residual wash buffer as completely as possible to prevent dilution of the eluate. Add an appropriate amount of acidic elution buffer / high-salt elution buffer to the beads and resuspend them thoroughly. Mix gently and incubate briefly at room temperature to allow the immunocomplex to dissociate from the beads. Separate the beads with a magnetic stand or low-speed centrifugation, and transfer the eluate to a collection tube pre-filled with an appropriate amount of neutralization buffer; adjust the pH if necessary. To improve recovery, elution may be repeated and the eluates pooled. The composition and volume of the elution buffer and neutralization buffer should be determined according to the instructions for the beads and kit used.
3.3 Post-elution sample handling
For protein activity assays, native protein complex analysis, or other non-denaturing analyses: do not add SDS sample loading buffer; keep the sample on ice and proceed to the subsequent experiment as quickly as possible.
For SDS-PAGE or Western blot: add SDS sample loading buffer to the neutralized or desalted eluate to a final concentration of 1×, and then process the sample according to the subsequent electrophoresis requirements.
Select appropriate storage conditions according to the stability of the target protein and the requirements of downstream experiments, and avoid repeated freeze–thaw cycles.
Downstream Analysis
Western blot analysis: Take the supernatant and perform SDS-PAGE electrophoresis followed by membrane transfer. It is recommended to use light- and heavy-chain-specific or conformation-specific secondary antibodies to avoid interference of the immunoglobulin heavy/light chain bands (50 kDa / 25 kDa) with detection of the target protein. It is recommended to include Input, isotype control IgG-IP, and target antibody-IP samples on the same Western blot; if necessary, a beads-only control may also be added to evaluate immunoprecipitation efficiency and non-specific binding. Kinase activity assay (if applicable): skip the denaturation step, wash the beads with kinase buffer, then add substrate and ATP directly to perform the kinase reaction.
Note: All lysis and immunoprecipitation procedures should be performed at 4°C or on ice to preserve the native conformation of proteins as much as possible and prevent their degradation. |
生物学的記述
| Specificity |
|---|
CDX2 Antibody (Rabbit mAb) [C20G4] recognizes endogenous levels of total CDX2 protein. |
| タンパク質の局在 |
|---|
| 細胞核 |
| Uniprot ID |
|---|
| Q99626 |
| Clone |
|---|
| C20G4 |
| Synonym(s) |
|---|
| CDX2,CDX-3 |
| Background |
|---|
CDX2 is a crucial homeobox transcription factor essential for intestinal development and differentiation. It regulates various cellular processes, including proliferation, apoptosis, chromosomal stability, migration, polarity, adhesion, and columnar shape. CDX2 is involved in the transdifferentiation of gastric and esophageal epithelial cells to an intestinal phenotype, particularly in conditions like Barrett's esophagus (BE) and gastric intestinal metaplasia (GIM). Its expression is regulated by factors such as NFkB, BMP2, BMP4, and Sonic hedgehog (Shh), with NFkB activating CDX2 in response to cytokine stimulation and BMP2 and BMP4 enhancing its expression through SMAD signaling. SOX2 and Shh suppress CDX2 in the gastric epithelium, and their loss is associated with ectopic CDX2 expression in gastric intestinal metaplasia (GIM). It also serves as a valuable marker in identifying colorectal adenocarcinoma and differentiating gastrointestinal neoplasms. |
| References |
|---|
技術サポート
ストックの作り方、阻害剤の保管方法、細胞実験や動物実験の際に注意すべき点など、製品を取扱う時に問い合わせが多かった質問に対しては取扱説明書でお答えしています。
他に質問がある場合は、お気軽にお問い合わせください。
* 必須

納期 国内在庫品:受注日の翌日(15時までの受注分) *北海道、九州、沖縄への配送は受注日より2日以上 を要する場合あり 海外在庫品:受注後1〜2週間