
- 阻害剤
- 研究分野別
- PI3K/Akt/mTOR
- Epigenetics
- Methylation
- Immunology & Inflammation
- Protein Tyrosine Kinase
- Angiogenesis
- Apoptosis
- Autophagy
- ER stress & UPR
- JAK/STAT
- MAPK
- Cytoskeletal Signaling
- Cell Cycle
- TGF-beta/Smad
- 化合物ライブラリー
- 抗体
- 新製品
- お問い合わせ

CUL3 Antibody (Rabbit mAb) [N12N7]
CatNo: F5527
Application:
Reactivity:
-
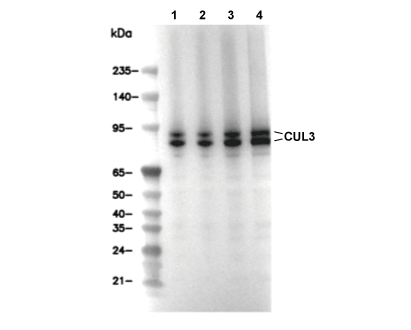 Lane 1: A204, Lane 2: A673, Lane 3: Neuro-2a, Lane 4: COS-7
当該製品は品切れ状态で、メールアドレスをご教示いただければ、お客様に返信いたします。
代表番号: 045-509-1970|電子メール:sales@selleck.co.jp
使用情報
| Dilution |
|---|
|
| Application |
|---|
| WB, IP |
| Source |
|---|
| Rabbit Monoclonal Antibody |
| Reactivity |
|---|
| Human, Mouse, Rat, Monkey |
| Storage Buffer |
|---|
| PBS, pH 7.2+50% Glycerol+0.05% BSA+0.01% NaN3 |
| Storage (from the date of receipt) |
|---|
| -20°C (avoid freeze-thaw cycles), 2 years |
| Predicted MW Observed MW |
|---|
| 89 kDa N/A |
| *なぜ予測分子量と実際の分子量が異なるのか? 下記の原因により、実際の分子量が予測と異なる:タンパク質の翻訳後修飾(リン酸化/糖鎖付加),スプライシングバリアント,イソフォーム,相対的な電荷,ポリマー。 |
| ポジティブコントロール | A-204 cells; A-673 cells; Neuro-2a cells; C6 cells; COS-7 cells; K-562 cells (MLN4924, 0.3uM, 16 h) |
|---|---|
| ネガティブコントロール |
プロトコール
| WB |
|---|
Experimental Protocol:
Sample preparation
1. Tissue: Lyse the tissue sample by adding an appropriate volume of ice-cold RIPA/NP-40 Lysis Buffer (containing Protease Inhibitor Cocktail),and homogenize the tissue at a low temperature or lyse it by sonication on ice, then incubate on ice for 30 minutes. 2. Adherent cell: Aspirate the culture medium and wash the cells with ice-cold PBS twice. Lyse the cells by adding an appropriate volume of RIPA/NP-40 Lysis Buffer (containing Protease Inhibitor Cocktail) , sonicate to lyse the cells, and incubate on ice for 30 minutes. 3. Suspension cell: Transfer the culture medium to a pre-cooled centrifuge tube. Centrifuge and aspirate the supernatant. Wash the cells with ice-cold PBS twice. Lyse the cells by adding an appropriate volume of RIPA/NP-40 Lysis Buffer (containing Protease Inhibitor Cocktail) , sonicate to lyse the cells, and incubate on ice for 30 minutes. 4. Place the lysate into a pre-cooled microcentrifuge tube. Centrifuge at 4°C for 15 min. Collect the supernatant;
5. Remove a small volume of lysate to determine the protein concentration;
6. Combine the lysate with protein loading buffer. Boil 20 µL sample under 95-100°C for 5 min. Centrifuge for 5 min after cool down on ice.
Electrophoretic separation
1. According to the concentration of extracted protein, load appropriate amount of protein sample and marker onto SDS-PAGE gels for electrophoresis. Recommended separating gel (lower gel) concentration: 10%. Reference Table for Selecting SDS-PAGE Separation Gel Concentrations 2. Power up 80V for 30 minutes. Then the power supply is adjusted (110 V~150 V), the Marker is observed, and the electrophoresis can be stopped when the indicator band of the predyed protein Marker where the protein is located is properly separated. (Note that the current should not be too large when electrophoresis, too large current (more than 150 mA) will cause the temperature to rise, affecting the result of running glue. If high currents cannot be avoided, an ice bath can be used to cool the bath.)
Transfer membrane
1. Take out the converter, soak the clip and consumables in the pre-cooled converter;
2. Activate PVDF membrane with methanol for 1 min and rinse with transfer buffer;
3. Install it in the order of "black edge of clip - sponge - filter paper - filter paper - glue -PVDF membrane - filter paper - filter paper - sponge - white edge of clip"; 4. The protein was electrotransferred to PVDF membrane. ( 0.45 µm PVDF membrane is recommended ) Reference Table for Selecting PVDF Membrane Pore Size Specifications Recommended conditions for wet transfer: 200 mA, 120 min. ( Note that the transfer conditions can be adjusted according to the protein size. For high-molecular-weight proteins, a higher current and longer transfer time are recommended. However, ensure that the transfer tank remains at a low temperature to prevent gel melting.)
Block
1. After electrotransfer, wash the film with TBST at room temperature for 5 minutes;
2. Incubate the film in the blocking solution for 1 hour at room temperature;
3. Wash the film with TBST for 3 times, 5 minutes each time.
Antibody incubation
1. Use primary antibody dilution buffer to prepare the primary antibody working liquid (recommended dilution ratio for primary antibody 1:1000), gently shake and incubate with the film at 4°C overnight; 2. Wash the film with TBST 3 times, 5 minutes each time;
3. Add the secondary antibody to the blocking solution and incubate with the film gently at room temperature for 1 hour;
4. After incubation, wash the film with TBST 3 times for 5 minutes each time.
Antibody staining
1. Add the prepared ECL luminescent substrate (or select other color developing substrate according to the second antibody) and mix evenly;
2. Incubate with the film for 1 minute, remove excess substrate (keep the film moist), wrap with plastic film, and expose in the imaging system. |
| IP |
|---|
Experimental Procedure:
Reagents and Preparation
1. Basic buffers: 1× PBS or 1× TBS (pre-chilled on ice); 1× cell lysis buffer (add 1 mM PMSF protease inhibitor immediately before use; add phosphatase inhibitors for phosphoproteins).
2. Capture medium: Protein A/G magnetic beads or agarose beads (Sepharose beads).
3. Controls: Use an isotype control IgG matching the host species and IgG subclass of the primary antibody, at the same concentration. It is recommended to reserve a portion of the cell lysate that has not been subjected to immunoprecipitation as the Input control; if necessary, a beads-only control (beads added without antibody) may also be included.
4. Loading and elution reagents: 3× or 4× SDS sample loading buffer (containing DTT/reducing agent); if non-denaturing elution is to be performed, prepare the corresponding elution buffer and neutralization buffer separately; for denaturing elution, 1× PBS is typically used to dilute the 3× or 4× SDS sample loading buffer to 1×.
Cell Lysis and Sample Preparation (Native Protein Extraction)
1. Cell harvesting: Discard the culture medium and wash the cells once with ice-cold 1× PBS.
2. Cell lysis: Add 0.5–1 mL of ice-cold 1× cell lysis buffer to a 10-cm culture dish and incubate on ice for 5–10 minutes.
3. Lysate collection and clarification: Scrape the cells and transfer the lysate to a microcentrifuge tube. Some adherent cells may require detachment using digestive enzymes or mechanical methods. Centrifuge at 14,000 rpm at 4°C for 5–15 min. Collect the supernatant as the clarified cell lysate. It is recommended to determine the protein concentration.
Pre-clearing and Immunoprecipitation Reaction
1. Pre-clearing of the lysate (recommended): Take an appropriate amount of beads (magnetic beads or agarose beads) and pre-wash 2–3 times with cell lysis buffer or 1× TBS/PBS. After pre-washing, it is recommended to remove the wash buffer as completely as possible before adding subsequent reagents, to avoid extra dilution of the sample. For lysis systems containing detergents or specific salt concentrations, prefer pre-washing with a buffer identical or compatible with the lysis buffer to minimize buffer-system mismatches.
2. Pre-clearing treatment: Mix the cell lysate with the pre-washed beads and incubate with rotation at room temperature for 30–60 min, or at 4°C with rotation for 1–2 h.
When using agarose beads, pellet the beads by centrifugation after incubation and collect the supernatant.
When using magnetic beads, separate the beads using a magnetic stand after incubation and collect the supernatant.
This step removes proteins that bind non-specifically to the beads. For unstable proteins, phosphoproteins, or protein complexes, incubation at 4°C is preferred to minimize protein degradation, dephosphorylation, or complex dissociation. Beads used for pre-clearing should generally not be pre-coupled with a specific antibody, to avoid loss of the target antigen.
3. Formation of the “bead–antibody–antigen” immunocomplex
Either of the following two approaches may be used:
3.1 Pre-form the antibody–antigen complex, then add the beads: Add an appropriate amount of primary antibody to the pre-cleared supernatant obtained in step 2, and set up an isotype control IgG group in parallel. Incubate with rotation at 4°C overnight (recommended), or at room temperature with rotation for 2 h, to allow formation of the antibody–antigen complex.
In parallel, take an appropriate amount of beads and pre-wash them as described in step 1 of this section. Add the antibody–antigen complex to the pre-washed magnetic or agarose beads and incubate with rotation at room temperature for 30 min–1 h, or at 4°C with rotation for 1–2 h, to allow the antibody–antigen complex to bind efficiently to the beads.
3.2 Pre-form the bead–antibody complex, then add the cell lysate: Dilute the primary antibody in cell lysis buffer at the dilution ratio recommended in the antibody instruction manual to prepare the antibody working solution. Add an appropriate amount of pre-washed magnetic beads to the antibody working solution and incubate with rotation at room temperature for 15 min, or at 4°C with rotation for 1 h, to form the bead–antibody complex.
Recover the beads by magnetic separation or centrifugation, discard the supernatant, and pre-wash the beads 2–3 times with 1× TBS. Then add the cell lysate and incubate with rotation at 4°C overnight (recommended), or at room temperature with rotation for 2 h.
Washing of the Precipitate and Sample Elution
1. Once immunoprecipitation is complete, separate the beads according to their type and discard the supernatant.
Magnetic beads are separated using a magnetic stand.
For agarose beads, low-speed centrifugation (500–1000 rpm) appropriate for the bead specifications should be used, to avoid bead compaction or damage caused by high-speed centrifugation.
2. Washing the beads: Gently wash the beads 3–5 times with ice-cold 1× cell lysis buffer or 1× TBS/TBST. Keep the temperature low throughout the washes. After each addition of wash buffer, mix gently to fully resuspend the beads; then separate the beads using a magnetic stand or appropriate centrifugation, depending on the bead type, and remove the wash buffer thoroughly to minimize unbound and non-specifically bound components. During each wash, remove as much supernatant as possible while avoiding aspiration of the beads. After the final wash, remove residual wash buffer as completely as possible to prevent dilution of the eluate or interference with downstream analyses. Keep the samples on ice after each wash.
3. Sample elution (choose one of the following):
3.1 Denaturing direct elution (most commonly used): Add SDS sample loading buffer to the bead pellet to a final concentration of 1×. If 3× or 4× SDS sample loading buffer is used, it must first be diluted to 1×. Mix well and heat at 95–100°C for 5 minutes. Separate the beads and collect the supernatant for subsequent electrophoresis.
3.2 Chemical / non-denaturing elution (preserves protein activity): After the final wash, separate the beads using a magnetic stand or low-speed centrifugation, depending on the bead type, and remove residual wash buffer as completely as possible to prevent dilution of the eluate. Add an appropriate amount of acidic elution buffer / high-salt elution buffer to the beads and resuspend them thoroughly. Mix gently and incubate briefly at room temperature to allow the immunocomplex to dissociate from the beads. Separate the beads with a magnetic stand or low-speed centrifugation, and transfer the eluate to a collection tube pre-filled with an appropriate amount of neutralization buffer; adjust the pH if necessary. To improve recovery, elution may be repeated and the eluates pooled. The composition and volume of the elution buffer and neutralization buffer should be determined according to the instructions for the beads and kit used.
3.3 Post-elution sample handling
For protein activity assays, native protein complex analysis, or other non-denaturing analyses: do not add SDS sample loading buffer; keep the sample on ice and proceed to the subsequent experiment as quickly as possible.
For SDS-PAGE or Western blot: add SDS sample loading buffer to the neutralized or desalted eluate to a final concentration of 1×, and then process the sample according to the subsequent electrophoresis requirements.
Select appropriate storage conditions according to the stability of the target protein and the requirements of downstream experiments, and avoid repeated freeze–thaw cycles.
Downstream Analysis
Western blot analysis: Take the supernatant and perform SDS-PAGE electrophoresis followed by membrane transfer. It is recommended to use light- and heavy-chain-specific or conformation-specific secondary antibodies to avoid interference of the immunoglobulin heavy/light chain bands (50 kDa / 25 kDa) with detection of the target protein. It is recommended to include Input, isotype control IgG-IP, and target antibody-IP samples on the same Western blot; if necessary, a beads-only control may also be added to evaluate immunoprecipitation efficiency and non-specific binding. Kinase activity assay (if applicable): skip the denaturation step, wash the beads with kinase buffer, then add substrate and ATP directly to perform the kinase reaction.
Note: All lysis and immunoprecipitation procedures should be performed at 4°C or on ice to preserve the native conformation of proteins as much as possible and prevent their degradation. |
生物学的記述
| Specificity |
|---|
| CUL3 Antibody (Rabbit mAb) [N12N7] detects endogenous levels of total CUL3 protein. |
| タンパク質の局在 |
|---|
| 細胞突起、繊毛、細胞質、細胞骨格、鞭毛、ゴルジ装置、細胞核 |
| Uniprot ID |
|---|
| Q13618 |
| Clone |
|---|
| N12N7 |
| Synonym(s) |
|---|
| CUL-3; CUL3; cullin 3; Cullin-3; KIAA0617; PHA2E |
| Background |
|---|
| CUL3 (Cullin-3) belongs to the cullin family of scaffold proteins that assemble Cullin-RING ubiquitin ligase (CRL) complexes, the largest class of E3 ligases in eukaryotic cells, and CUL3 forms one of eight distinct cullin-based assemblies distinguished by their substrate-recognition modules. CUL3 anchors the RING-finger catalytic protein Rbx1 at its C-terminus, positioning the ubiquitin-charged E2 conjugating enzyme for substrate transfer, while its N-terminal domain binds directly to BTB (Bric-a-brac/Tramtrack/Broad complex) domain-containing adaptor proteins that simultaneously serve as substrate receptors, a modular arrangement that removes the need for a separate linker subunit and distinguishes CUL3 complexes from other cullin-RING assemblies. BTB adaptors combine their conserved Cul3-binding domain with a second, variable domain such as Kelch, MATH, zinc finger, or PHR that dictates substrate specificity, and this combinatorial pairing allows CUL3 to organize a large repertoire of distinct ubiquitin ligase complexes from a single scaffold. BTB adaptors are also capable of dimerization, allowing two CUL3 molecules to be incorporated into a single ligase complex, a configuration linked to substrate ubiquitination efficiency. Ligase activation depends on conjugation of the ubiquitin-like protein Nedd8 onto a conserved C-terminal lysine of CUL3, which reshapes the Rbx1 RING domain and increases its conformational flexibility, bringing the E2 enzyme into proximity with the substrate for efficient ubiquitin transfer. Through this mechanism, CUL3 complexes direct proteasomal degradation of substrates governing cell cycle progression, transcriptional regulation, and developmental differentiation. Among characterized CUL3-BTB pairings, Keap1 links CUL3 to Nrf2, controlling the oxidative stress response, KLHL20 bridges CUL3 to substrates including PML and DAPK, influencing tumor suppressor turnover, and SPOP directs CUL3 activity toward substrates involved in transcriptional and signaling regulation, and dysregulation of these adaptor-substrate relationships is observed across multiple human cancers, altering ligase output and stabilizing or depleting proteins that shape tumor progression and therapeutic response. The single-adaptor bridging design, combined with tissue-specific expression of individual BTB proteins, makes CUL3 ligase complexes a tractable framework for dissecting selective protein degradation pathways and for identifying which adaptor-substrate module underlies a particular physiological or disease phenotype, information that is directly relevant when researchers are selecting CUL3-associated targets for functional or therapeutic study. |
| References |
|---|
技術サポート
ストックの作り方、阻害剤の保管方法、細胞実験や動物実験の際に注意すべき点など、製品を取扱う時に問い合わせが多かった質問に対しては取扱説明書でお答えしています。
他に質問がある場合は、お気軽にお問い合わせください。
* 必須

納期 国内在庫品:受注日の翌日(15時までの受注分) *北海道、九州、沖縄への配送は受注日より2日以上 を要する場合あり 海外在庫品:受注後1〜2週間