
- 阻害剤
- 研究分野別
- PI3K/Akt/mTOR
- Epigenetics
- Methylation
- Immunology & Inflammation
- Protein Tyrosine Kinase
- Angiogenesis
- Apoptosis
- Autophagy
- ER stress & UPR
- JAK/STAT
- MAPK
- Cytoskeletal Signaling
- Cell Cycle
- TGF-beta/Smad
- 化合物ライブラリー
- 抗体
- 新製品
- お問い合わせ
Dishevelled 3 Antibody (Rabbit mAb) [J9L3]
Catalog No.: F3986
Application:
Reactivity:
-
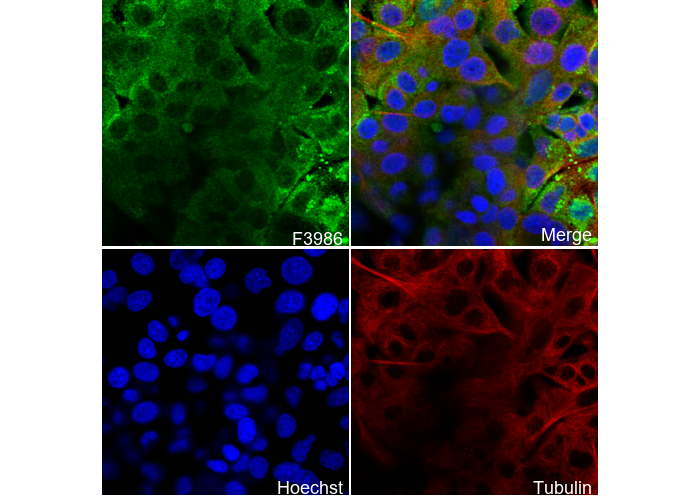 Immunofluorescent analysis of PC-12 cells using F3986 (green, 1:230), Hoechst (blue) and tubulin (Red).
 -
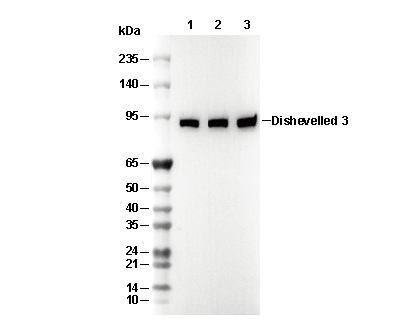 Lane 1: K-562, Lane 2: RAW 264.7, Lane 3: C6
使用情報
| Dilution |
|---|
|
| Application |
|---|
| WB, IF, FCM |
| Source |
|---|
| Rabbit Monoclonal Antibody |
| Reactivity |
|---|
| Mouse,Rat,Human |
| Storage Buffer |
|---|
| PBS, pH 7.2+50% Glycerol+0.05% BSA+0.01% NaN3 |
| Storage (from the date of receipt) |
|---|
| -20°C (avoid freeze-thaw cycles), 2 years |
| Predicted MW |
|---|
| 78 kDa |
| ポジティブコントロール | PC-12 cell; HeLa cell; K-562 cell; RAW 264.7 cell; C6 cell |
|---|---|
| ネガティブコントロール |
プロトコール
| WB |
|---|
Experimental Protocol:
Sample preparation
1. Tissue: Lyse the tissue sample by adding an appropriate volume of ice-cold Lysis Buffer (containing Protease Inhibitor Cocktail),and homogenize the tissue at a low temperature. 2. Adherent cell: Aspirate the culture medium and wash the cells with ice-cold PBS twice. Lyse the cells by adding an appropriate volume of Lysis Buffer (containing Protease Inhibitor Cocktail) and put the sample on ice for 5 min. 3. Suspension cell: Transfer the culture medium to a pre-cooled centrifuge tube. Centrifuge and aspirate the supernatant. Wash the cells with ice-cold PBS twice. Lyse the cells by adding an appropriate volume of Lysis Buffer (containing Protease Inhibitor Cocktail) and put the sample on ice for 5 min. 4. Place the lysate into a pre-cooled microcentrifuge tube. Centrifuge at 4°C for 15 min. Collect the supernatant;
5. Remove a small volume of lysate to determine the protein concentration;
6. Combine the lysate with protein loading buffer. Boil 20 µL sample under 95-100°C for 5 min. Centrifuge for 5 min after cool down on ice.
Electrophoretic separation
1. According to the concentration of extracted protein, load appropriate amount of protein sample and marker onto SDS-PAGE gels for electrophoresis. Reference Table for Selecting SDS-PAGE Separation Gel Concentrations 2. Power up 80V for 30 minutes. Then the power supply is adjusted (110 V~150 V), the Marker is observed, and the electrophoresis can be stopped when the indicator band of the predyed protein Marker where the protein is located is properly separated. (Note that the current should not be too large when electrophoresis, too large current (more than 150 mA) will cause the temperature to rise, affecting the result of running glue. If high currents cannot be avoided, an ice bath can be used to cool the bath.)
Transfer membrane
1. Take out the converter, soak the clip and consumables in the pre-cooled converter;
2. Activate PVDF membrane with methanol for 1 min and rinse with transfer buffer;
3. Install it in the order of "black edge of clip - sponge - filter paper - filter paper - glue -PVDF membrane - filter paper - filter paper - sponge - white edge of clip"; 4. The protein was electrotransferred to PVDF membrane. Reference Table for Selecting PVDF Membrane Pore Size Specifications ( Note that the transfer conditions can be adjusted according to the protein size. For high-molecular-weight proteins, a higher current and longer transfer time are recommended. However, ensure that the transfer tank remains at a low temperature to prevent gel melting.)
Block
1. After electrotransfer, wash the film with TBST at room temperature for 5 minutes;
2. Incubate the film in the blocking solution for 1 hour at room temperature;
3. Wash the film with TBST for 3 times, 5 minutes each time.
Antibody incubation
1. Use 5% skim milk powder to prepare the primary antibody working liquid (recommended dilution ratio for primary antibody 1:1000), gently shake and incubate with the film at 4°C overnight; 2. Wash the film with TBST 3 times, 5 minutes each time;
3. Add the secondary antibody to the blocking solution and incubate with the film gently at room temperature for 1 hour;
4. After incubation, wash the film with TBST 3 times for 5 minutes each time.
Antibody staining
1. Add the prepared ECL luminescent substrate (or select other color developing substrate according to the second antibody) and mix evenly;
2. Incubate with the film for 1 minute, remove excess substrate (keep the film moist), wrap with plastic film, and expose in the imaging system. |
| IF |
|---|
Experimental Protocol:
Specimen Preparation
1. Aspirate liquid, then cover cells to a depth of 2–3 mm with 4% Paraformaldehyde diluted in 1X PBS.
NOTE: Paraformaldehyde is toxic, use only in a fume hood.
2. Fix cells for 15 min at room temperature.
3. Aspirate fixative, rinse three times in 1X PBS for 5 min each.
4. Proceed with Immunostaining.
Immunostaining
1. Add theblocking buffer and incubate for 60 min at RT.
2. Prepare primary antibody diluent in antibody dilution buffer as recommended .
3. Aspirate blocking solution, apply diluted primary antibody.
4. Incubate overnight at 4°C.
5. Rinse three times in 1X PBS for 5 min each.
6. Incubate specimens in fluorochrome-conjugated secondary antibody diluted in antibody dilution buffer for 1–2 hr at room temperature in the dark.
7. Rinse three times in 1X PBS for 5 min each.
8. Mount slides usingmounting medium with DAPI and cover with coverslips.
9. For best results, allow mountant to cure overnight at room temperature. For long-term storage, store slides flat at 23°C protected from light.
|
| IF |
|---|
Experimental Protocol:
Sample Preparation
1. Adherent Cells: Place a clean, sterile coverslip in a culture dish. Once the cells grow to near confluence as a monolayer, remove the coverslip for further use.
2. Suspension Cells: Seed the cells onto a clean, sterile slide coated with poly-L-lysine.
3. Frozen Sections: Allow the slide to thaw at room temperature. Wash it with pure water or PBS for 2 times, 3 minutes each time.
4. Paraffin Sections: Deparaffinization and rehydration. Wash the slide with pure water or PBS for 3 times, 3 minutes each time. Then perform antigen retrieval.
Fixation
1. Fix the cell coverslips/spots or tissue sections at room temperature using a fixative such as 4% paraformaldehyde (4% PFA) for 10-15 minutes.
2. Wash the sample with PBS for 3 times, 3 minutes each time.
Permeabilization
1.Add a detergent such as 0.1–0.3% Triton X-100 to the sample and incubate at room temperature for 10–20 minutes.
(Note: This step is only required for intracellular antigens. For antigens expressed on the cell membrane, this step is unnecessary.)
Wash the sample with PBS for 3 times, 3 minutes each time.
Blocking
Add blocking solution and incubate at room temperature for at least 1 hour. (Common blocking solutions include: serum from the same source as the secondary antibody, BSA, or goat serum.)
Note: Ensure the sample remains moist during and after the blocking step to prevent drying, which can lead to high background.
Immunofluorescence Staining (Day 1)
1. Remove the blocking solution and add the diluted primary antibody.
2. Incubate the sample in a humidified chamber at 4°C overnight.
Immunofluorescence Staining (Day 2)
1. Remove the primary antibody and wash with PBST for 3 times, 5 minutes each time.
2. Add the diluted fluorescent secondary antibody and incubate in the dark at 4°C for 1–2 hours.
3. Remove the secondary antibody and wash with PBST for 3 times, 5 minutes each time.
4. Add diluted DAPI and incubate at room temperature in the dark for 5–10 minutes.
5. Wash with PBST for 3 times, 5 minutes each time.
Mounting
1. Mount the sample with an anti-fade mounting medium.
2. Allow the slide to dry at room temperature overnight in the dark.
3. Store the slide in a slide storage box at 4°C, protected from light.
|
生物学的記述
| Specificity |
|---|
| Dishevelled 3 Antibody (Rabbit mAb) [J9L3] detects endogenous levels of total Dishevelled 3 protein. |
| タンパク質の局在 |
|---|
| 細胞質 |
| Uniprot ID |
|---|
| Q92997 |
| Clone |
|---|
| J9L3 |
| Synonym(s) |
|---|
| KIAA0208; DVL3; Segment polarity protein dishevelled homolog DVL-3; Dishevelled-3; DSH homolog 3 |
| Background |
|---|
| Dishevelled 3 (Dvl3) is one of three mammalian Dishevelled proteins and is part of a highly conserved family that mediates signal transduction in both the canonical β-catenin/Wnt and planar cell polarity (PCP) pathways. Dvl3 integrates extracellular Wnt signals received via Frizzled receptors to downstream effectors that regulate cell proliferation, tissue patterning, and cellular polarity. Dvl3 contains several conserved domains: DIX (involved in signalosome formation), PDZ (mediating protein-protein interactions), and DEP (essential for membrane localization and pathway specificity). The DEP domain adopts a three-helix bundle structure with specific β-strand arms and clusters of basic residues that facilitate targeting and interaction mechanisms. Dvl3 acts as a central scaffold and binding hub for numerous regulatory partners that shape embryonic development, including cardiac outflow tract formation, neural tube closure, and cochlear polarity, through both redundancy and dosage-sensitive compensation with other Dishevelled proteins. Loss of Dvl3 disrupts these developmental processes and impairs the proper orientation of stereocilia. The function of Dvl3 is dosage-dependent and tightly regulated by membrane associations and specific electrostatic interactions within its DEP domain, which govern subcellular localization and pathway engagement. The PCP pathway requires Dvl3 for coordinating convergent extension and tissue morphogenesis, while the canonical β-catenin/Wnt pathway can tolerate lower Dvl levels but still relies on normal Dvl3 presence for robust developmental signaling. Deficiency of Dvl3 leads to congenital heart defects and neural tube defects. |
| References |
|---|
技術サポート
ストックの作り方、阻害剤の保管方法、細胞実験や動物実験の際に注意すべき点など、製品を取扱う時に問い合わせが多かった質問に対しては取扱説明書でお答えしています。
他に質問がある場合は、お気軽にお問い合わせください。
* 必須
納期 国内在庫品:受注日の翌日(15時までの受注分) *北海道、九州、沖縄への配送は受注日より2日以上 を要する場合あり 海外在庫品:受注後1〜2週間